Trending

Showing posts with label Nails. Show all posts

March 13, 2015

OMGNailStrips Nail Wraps Sneak Preview

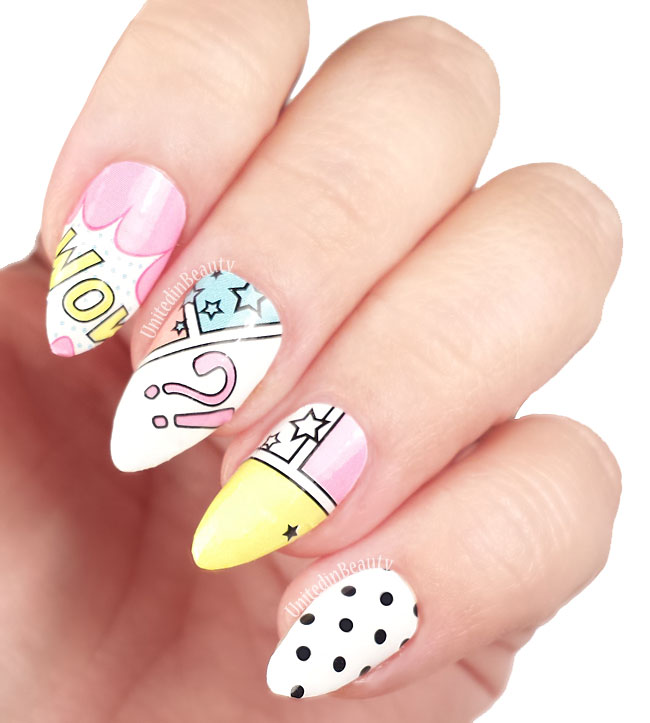
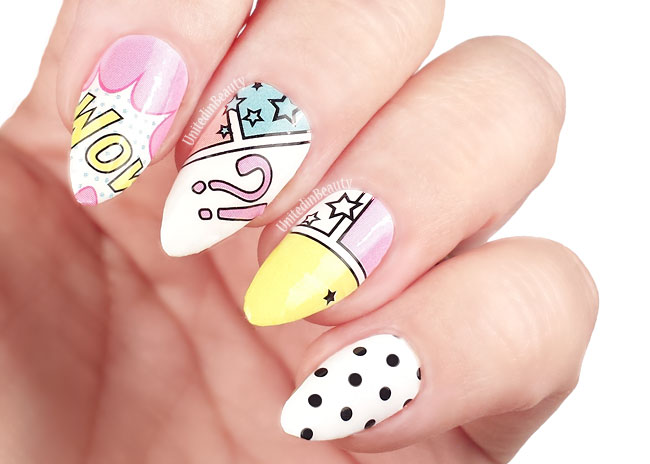
OMG-nail-strips-pop-art
As promised, I wanted to take today to show you guys a sneak peek of these two new upcoming nail wrap designs from OMGNailStrips! Both of these are going to be up on their website for purchase soon, but you get to see them here first! Am I good to you guys or what? *WINK*
OMG-nail-strips-pop-art
This cartoonish pop art nail wrap is my favorite right now, I love the pastel colors. As a sidenote, I'm really loving how much pop art designs are making a comeback in fashion right now, I'd love to get the skills to do some pop art greyscale makeup for Halloween this year!
Omg nail strips
The second design is super cute! The set comes with a few different mustaches, a polka dotted tie, a bow tie, and a little beret. Adorbs! I got a lot of compliments on these the day that I wore them out and about while I was running a few errands and doing some shopping. Nail compliments are the best compliments!
Each pack retails for $7.99 and comes with 14 strips ranging in size from 10mm to 17.5mm, which means they can fit a wide variety of nail sizes. If you have short nails, you might even be able to get 2 full manicures out of each pack. At my nail length, I was able to get a full manicure and a pedicure done, which is a definite plus! You can pick up these two brand new nail wrap designs and over 100 more online at OMGNailStrips website.

Have you ever tried any type of nail wraps before? Were they a hit or a miss for you, what was your experience? 
SHARE:

March 9, 2015

Hot Lips Manicure - OMG Nail Strips Sneak Preview

Valentine's Day Hot Lips Manicure by @unitedinbeauty
I am feeling the love today, how cute is this hot lips design?! I decided since I'm on a roll with my Coral and Black Hearts Manicure, I might as well keep the party going with these. I mean a girl needs time to plan her nails, right?! It's not weird to spend an entire month planning how you will do your nails for just one day, is it? Not weird at all!
Valentine's Day Hot Lips Manicure by @unitedinbeauty
As a bonus, you guys are getting a sneak peek of these nail wraps from OMGNailStrips! These are not even available for purchase on the website yet, but they are coming up soon and I wanted to be the first one to show you all. Stayed tuned on the blog, because I've got two more unreleased designs that I have the pleasure of debuting to you guys! These are adorable, and are honestly my favorite brand of nail wraps. They fit my fingers perfectly, and are so easy to work with. I highly recommend them!
SHARE:

February 28, 2015

E! Manicam Coverage at the 2015 Golden Globes

Jennifer Lopes Golden Globes 2015
Photo: Jason Merritt/Getty Images
Jennifer Lopez went for a toned down rose gold, wearing L’OrĂ©al Paris Colour Riche Nail Polish in Charmed, I’m Sure. A drastic change from last year's graffiti inspired manicure by far! The polish is full coverage, while the dress seems to be about half a millimeter away from a <AHEM> major wardrobe malfunction. -_-
Julia Goldani Telles Golden Globes 2015
Photo:Jeff Vespa/WireImage
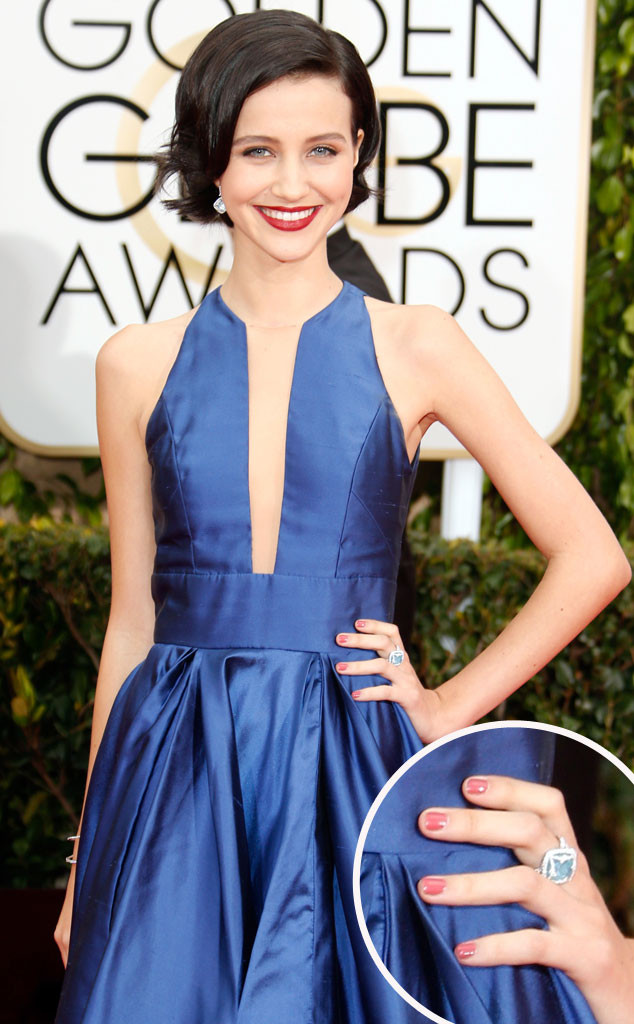
Julia Goldani Telles chose a medium toned peachy pink polish to accent her gorgeous blue dress. While the shade is lovely, it's leaving a bit to be desired for me. I do find the dress to be stunning,  though I think she could have really made her nails pop with a beautiful bright red to match the color of her lips.
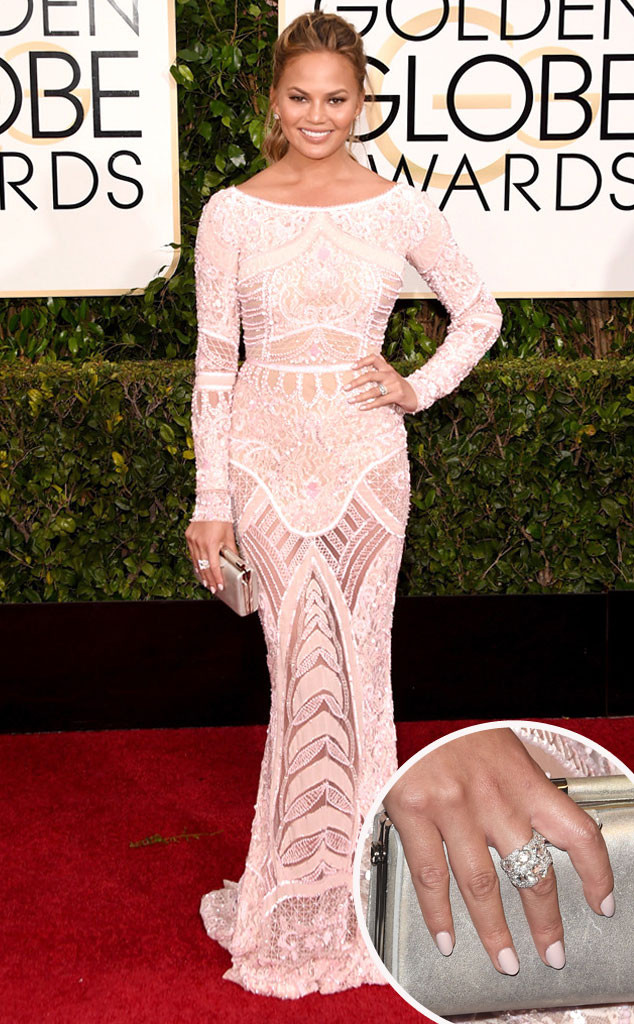
Chrissy Teigen Golden Globes 2015
Photo:Jason Merritt/Getty Images, Getty
Chrissy Teigen picked both a stunning gown and a stunning polish, for me she stole the show! I am a fan of matching the nails to the look, and this was a perfect match. The accents of her gown are so intricate, the understated nails are spot on and exactly what was needed. Personally, I would have added a glitter gradient accent nail, but we all know I'm a girl that needs a bit of bling!
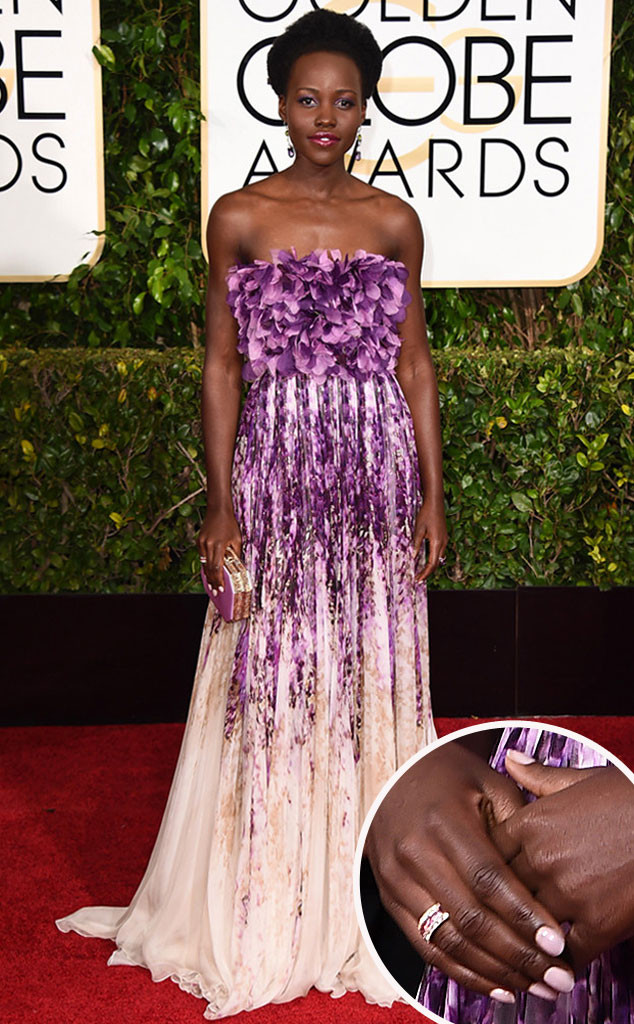
Lupita Nyong'o Golden Globes
Photo: Jordan Strauss/Invision/AP
Lupita Nyong'o also chose to let her purple floral Giambattista Valli Couture gown shine by choosing a soft pale pink nail shade with thin french manicure tips. As much as I love a good solid polish from time to time, I have to say that I am seriously feeling bummed at such a lack of nail art this year. Last years Golden Globes manicam showed tons of nail art, and I was really looking forward to a repeat performance.
Katie Holmes Golden Globes
Photo: Jordan Strauss/Invision/AP, Getty
Katie Holmes did not disappoint, giving me the closest thing to nail art by using China Glaze Pelican Gray with a layer of Tinsel Town to create this gorgeous gradient. I love that her deep violet Marchesa dress is simple and she lets her glitter tipped shoes and nails bring the sparkle to the ensemble.
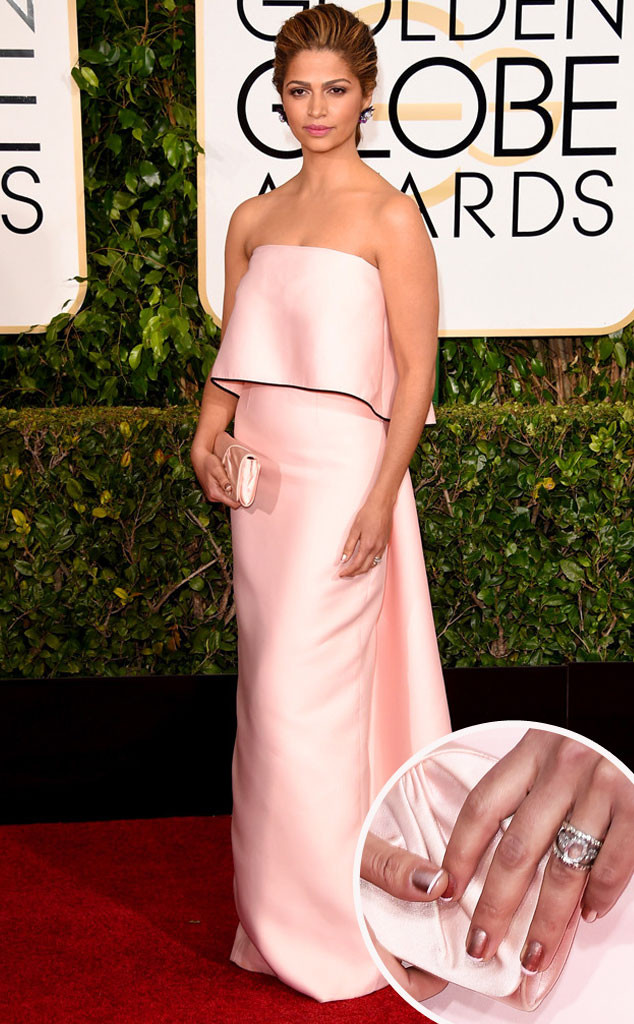
Camila Alves Golden Globes
Photo: Jason Merritt/Getty Images, Frazer Harrison/Getty Images
Camila Alves, as beautiful as she is, unfortunately just did not wow me with this look. I really thought she was going to show up and blow the crowd away, but the smock topped dress didn't do her wonderful figure any favors, and this copper colored french manicure just left me feeling a bit meh.
Jessica Chastain Golden Globes
Photo: Jordan Strauss/Invision/AP
Jessica Chastain debuted one of the darkest nail hues of the night along with her bronze Atelier Versace gown. The photo makes it hard to determine, but it looks to be either a dark copper or a pure black polish.
Ellie Kemper Golden Globes
Photo: John Shearer/Invision/AP, Getty
Ellie Kemper's ornate Naeem Khan frock was a huge YES for me! I loved the intricate beading and the small colored accents. I think she absolutely made the right choice with her classic bold red lips and matching manicure.
Quvenzhané Wallis Golden Globes
Photo:Jason Merritt/Getty Images
How beautiful is this little budding fashionista? Quvenzhané Wallis is rocking both her perfect lavender manicure with white accent bow and her custom made Giorgio Armani dress. I love how they kept her look both fun and age appropriate!

What did you think of the Golden Globes this year? Did you watch? We're this fashion and beauty  looks hits or misses for you?
SHARE:

January 11, 2015

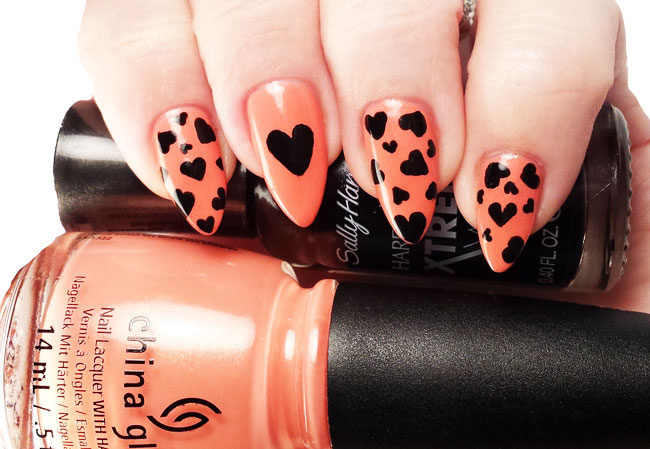
China Glaze Mimosas Before Manis - Coral and Black Hearts Nail Art


China Glaze Mimosa Before Manis by @unitedinbeauty

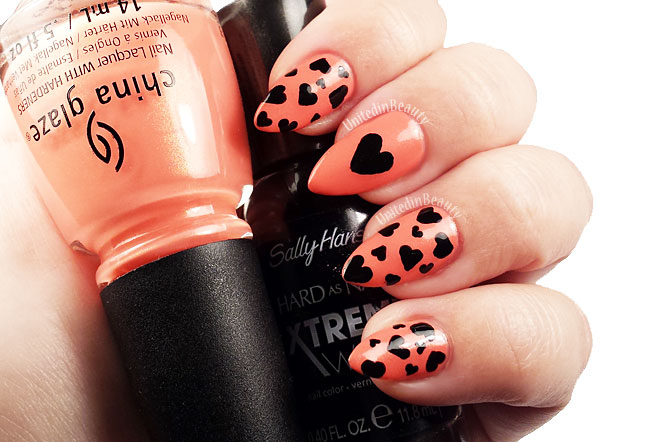
Happy Sunday everyone! I know we're a little over a month away from Valentine's Day, but I picked up this adorable new coral shirt with black hearts the other day and it totally inspired me. I just couldn't resist recreating it on my nails too! It might be a bit early, but I suppose there's never a wrong time for hearts! Besides, soon enough we will all be bombarded with thousands of Valentine's Day heart manicures and there's nothing wrong with being the early bird, is there? After all, they do get the pleasure of eating worms, lucky them! -_-

China Glaze Mimosa Before Manis by @unitedinbeauty
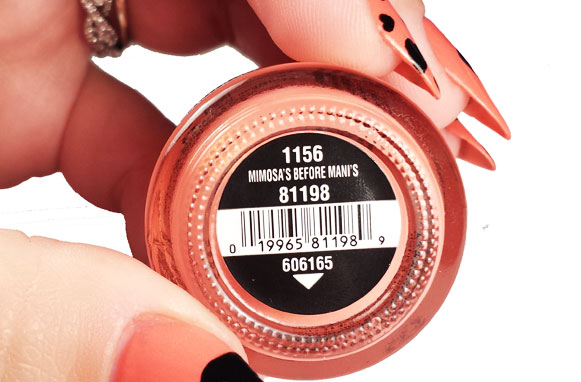
The base polish that I used is two coats of China Glaze Mimosa's Before Mani's. Before I get into the rest of the details, I just have to say that man, typing out those grammatical errors HURT. China Glaze, You got some splanin' to do! Seriously though, take a good look at the next photo. See that? See those big glaring apostrophes that aren't supposed to be there? Believe it or not, the name of the polish really is printed like that. The first time that I saw it, I actually wondered if I received a badly counterfeit nail polish until good ole reliable Google showed me that they somehow meant to print them this way. Grammatically incorrect nail polish names? Can. Not. Deal. China Glaze - Fire whoever the head polish name printer is, and hire this girl right here. 'Nuff said.

China Glaze Mimosa Before Manis by @unitedinbeauty
Rant and horrible grammatical errors aside, let's get back to business. This polish is the bomb. It's an AMAZINGLY PERFECT peachy coral shade that has just a hint of a fabulous gold shimmer to it. My camera had some difficulty picking up the shimmer on my nails,  but if you take a good look at the bottle in my photos you'll be able to see it. I feel like I spent forever last summer trying to find a really great polish in this color. I must have about 10 different peach/pink/corals in my collection now, and I must admit that I love them all.
China Glaze Mimosa Before Manis by @unitedinbeauty
Once the Mimosa's Before Mani's was complete dry, I used my favorite black polish Orly Liquid Vinyl and one of the smallest detail brushes from my Royal and Langnickel RMAJ Detail Brush Set to hand paint the black hearts over top. I let the hearts dry completely to avoid streaking, then topped with Seche Vite Dry Fast Top Coat.

You may have noticed by now that my thumb is a bit camera shy, I often get asked on Instagram what is painted on my thumbnail so I figured today I'd share with you. For this look, my thumb is painted with a black heart on the tip just like the ones in these red heart tipped stiletto nails.

China Glaze Mimosa Before Manis by @unitedinbeauty
 - Polishes  Used -
  • China Glaze - Mimosa's Before Mani's
  • Orly - Liquid Vinyl
  • Seche Vite Dry Fast Topcoat
- Extras - 
  • Dotting Tools
  • Royal and - Langnickel RMAJ Detail Brush Set
I'm not sure if you'll be able to tell, but I've been working on trying to improve my nail photos lately, and I tried a different technique for all of the photos in this post. Can you see a difference? I'd love any tips, tricks or suggestions you might have for me! Did anyone else rage out at the grammatical errors on their Mimosa's Before Mani's polish bottle? As always, don't forget #HeyUnitedinBeauty if you recreate or are inspired. I'd love to see!
SHARE:

January 10, 2015

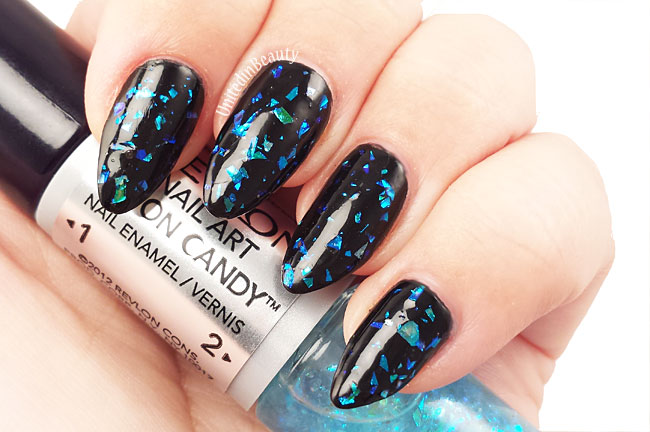
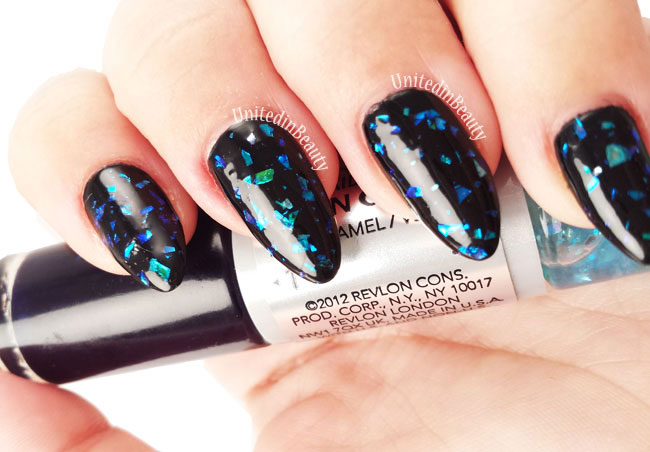
Revlon Moon Candy Galactic - Swatches and Review

Revlon Moon Candy Galactic by @unitedinbeauty
I know, I know, I'm a bit late and I missed the great Revlon Moon Candy bandwagon of 2014 but I'm discovering it all over again, and I am in LOVE! I'm honestly just discovering the magic of flakies for the first time, and I can't take my eyes off of them. So much holographic goodness!
Revlon Moon Candy Galactic by @unitedinbeauty
Galactic is by far my favorite out of the entire Revlon Moon Candy collection. It's a double ended polish, with one side being a very deep dark purple, which appears almost blue black under certain lighting. I wanted to emphasize the flakies and let them stand out as much as possible, so for my manicure I used Orly Liquid Vinyl, which is a very glossy black.

The blue and green holographic flakies are a great size, and I had no trouble with getting them to lay flat on my nails. They are a bit chunky, so I added three coats of Seche Vite Fast Dry Topcoat to be sure to encase them completely.

Overall, I'd give Revlon Moon Candy a total thumbs up, the flakies are gorgeous, are just the right size, and made for a fabulous manicure with minimal effort. I know I'll be using this polish again!
SHARE:

January 9, 2015

Lavender and White Nails with Color Club Covered in Diamonds Accents

Maybelline Color Show Lust for Lilac by @unitedinbeauty
As you may have noticed, I've been on a bit of a hand painting kick lately, and the streak continues! These are bright and fun, and easy enough for even beginners to recreate. I started by painting my nails with 2 coats of Lust for Lilac, and added the holographic flakey accents once the base coat was fully dry. Just to add a little zip, I used my nail art brushes to hand paint the lines on each finger. Easy peasy!
Maybelline Color Show Lust for Lilac by @unitedinbeauty
- Polishes  Used -
  • Maybelline Color Show - Lust for Lilac
  • Color Club - Covered in Diamonds
  • China Glaze - White on White
  • Seche Vite Fast Dry Topcoat  
- Tools - 
  • Royal & Langnickel - RMAJ Detail Brush Set 
  • Masters Touch - Angle Shader
SHARE:

January 8, 2015

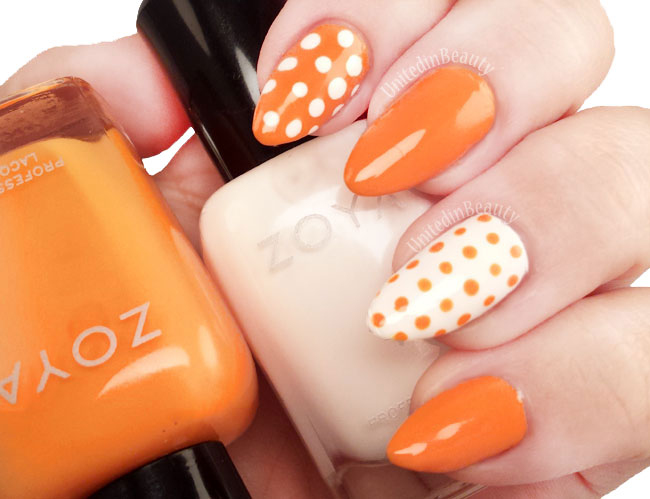
Orange and White Polka Dot Nails

Orange and white polka dot dotticure nails by @unitedinbeauty

I don't know about where you all are, but here in Ohio the weather we are experiencing right now can best be described in two words : Drab and Blech! I might not be able to control the weather outside, but I definitely can make it feel like summer on my nails with some bright, cheerful colors! This dotticure certainly perked up my mood today, I love this fab bright orange so much!

- Polishes  Used -
  •  Zoya - Arizona and Purity
  • Seche Vite Fast Dry Topcoat
- Extras - 
  • Dotting Tools
Step 1: Begin by applying 2 coats of Arizona by Zoya ( or Purity for the ring finger accent nail) and allow to dry completely. 
Step 2: Once dry, use a medium sized dotting tool to create polka dots in the opposite color. To get perfectly round and even sized dots, you will want to dip the end of your dotting tool into the polish after each dot. For best results, use a light hand and just dab the end to your nails. PRO TIP: You can also use a bobby pin or the end of a makeup brush in a pinch if you do not have dotting tools!
Step 3: Allow your dots to dry completely in order to avoid smearing, then apply a coat of Seche Vite Fast Dry Topcoat. Typically, Seche Vite is to be applied while the polish is still slightly wet, but in this case your dots will smear if you do not let them dry fully.
Step 4: Kick back and enjoy your new dotted manicure!

What do you guys think, is this one a hit or a miss for you? How's the weather in your neck of the woods?
SHARE:

January 7, 2015

New Zoya Delight Collection - Coming Spring 2015

Zoya Delight Collection Spring 2015
It's the most wonderful time of the year again, no not Christmas silly, that fat guy has left the building...Guess again! Time for the Spring collections to be announced! This is undoubtedly my absolute favorite season - brights, pastels, shimmer <insert Homer Simpson drool here.> Every year, the Spring collections always bring all of the things that I love and this year is already off to a good start with the new Zoya Delight Spring 2015 Collection!
Zoya Delight Collection Spring 2015

This year, inspired by the soft and airy colors of the season, Zoya Delight serves up three cheerful creams and three turquoise flash metallics for an updated, flirty way to wear pastels! This means 6 new shades for us to feast our eyes and fingertips upon! Shut up and take my money!
Zoya Delight Collection Spring 2015
  • ZP773/Lillian: Faded aquamarine with a glossy cream finish.
  • ZP777/Eden: Classic spring flower pink in a glossy cream finish.
  • ZP774/Tiana: Palette-cleansing ‘pistachio gelato’ green in a glossy cream finish.
Zoya Delight Collection Spring 2015
  • ZP775/Daisy: Refreshing ‘lemon merengue’ yellow with a turquoise metallic flash.
  • ZP776/Leslie: Soft spring lavender with a turquoise metallic flash.
  • ZP772/Rayne: Dewy, spring blue with an energizing turquoise metallic flash.
 AVAILABLE 02/02/15!
Zoya Delight Collection Spring 2015
BIG5FREE: Zoya Professional Nail Lacquer formula contains no formaldehyde, formaldehyde resin, dibutyl phthalate, toluene or camphor.

The new Zoya Delight Collection will retail for $9 per bottle and is available for purchase in top salons, spas and on zoya.com.

I am seriously drooling over Daisy, I am a sucker for a good yellow! Which one is your favorite?
SHARE:

January 6, 2015

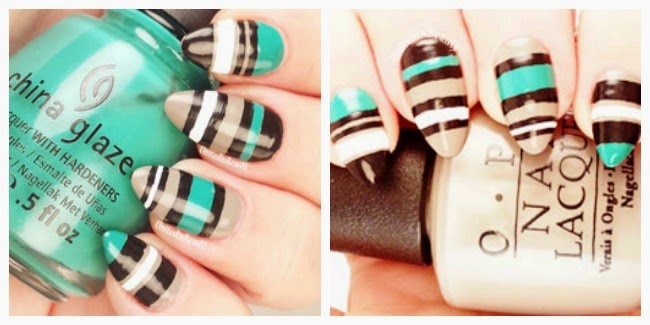
Freehand Green and Tan Striped Nails

Freehand striped nails by @unitedinbeauty
Today I've got a quick post for you with some fun green, black, white and tan striped nail art. These were done completely freehand using a set of very thin nail art brushes that I picked up from my local Hobby Lobby, but in retrospect I really wish I would have used some striping tape. It probably would have cut my time in half and I would have gotten much crisper lines. I guess what they say is true, hindsight is 20/20!

- Polishes  Used -
  •  OPI - French Quarter For Your Thoughts
  •  China Glaze - Four Leaf Clover & White on White
  • Orly - Liquid Vinyl  
  • Seche Vite Fast Dry Topcoat  
       
- Tools - 
  •   Royal & Langnickel - RMAJ Detail Brush Set 
Freehand striped nails by @unitedinbeauty
SHARE:

January 4, 2015

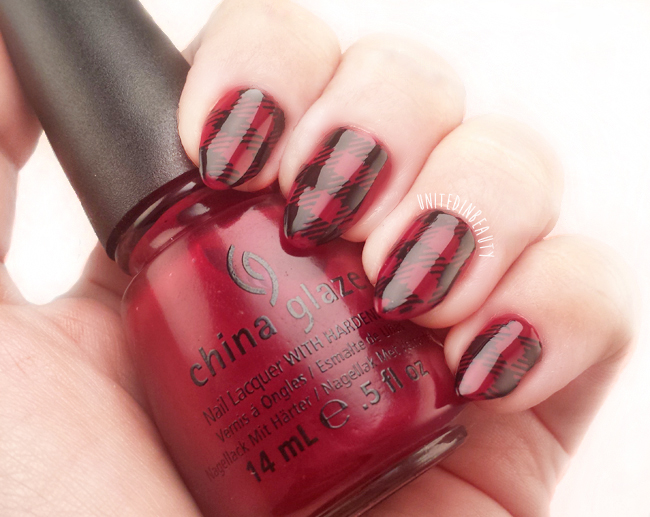
Red Plaid Flannel Shirt Nails


red plaid flannel shirt nails by @unitedinbeauty

This manicure is 100% inspired by my favorite outfit lately, a nice red flannel shirt, leggings and flats. I pretty much live in it these days, so my nails might as well match right? I'm sure everyone is just about partied out from all of the Christmas festivities over the next few days, and if I know one thing it's that when the holidays wind down it's finally time for me to relax - Hey a girl's gotta be comfy! I thought these red plaid flannel shirt nails would represent my favorite comfy outfit perfectly!
red plaid flannel shirt nails by @unitedinbeauty

I've been trying to work on my stamping skills, so this was another great opportunity. The base of my nails is 2 coats of China Glaze-Merry Berry, which I found to be thinner than other China Glaze polishes for some reason. Maybe I just got a funky bottle? If you've noticed this too, let me know down below in the comments. For the plaid pattern, I used the Mash-50 stamping plate, a squishy white "marshmellow" stamper, and black Konad polish.

It's a bit hard to pick up in the photos, because the stamping is subtle, but I really like the look of this design. It completely reminds me of being nice and warm, wrapped up in a cozy flannel shirt or blanket. Bring on the fuzzy feelings!

What's your favorite warm weather outfit? Are you a flannel or sweater kinda gal when it's cold outside? 
SHARE:

January 2, 2015

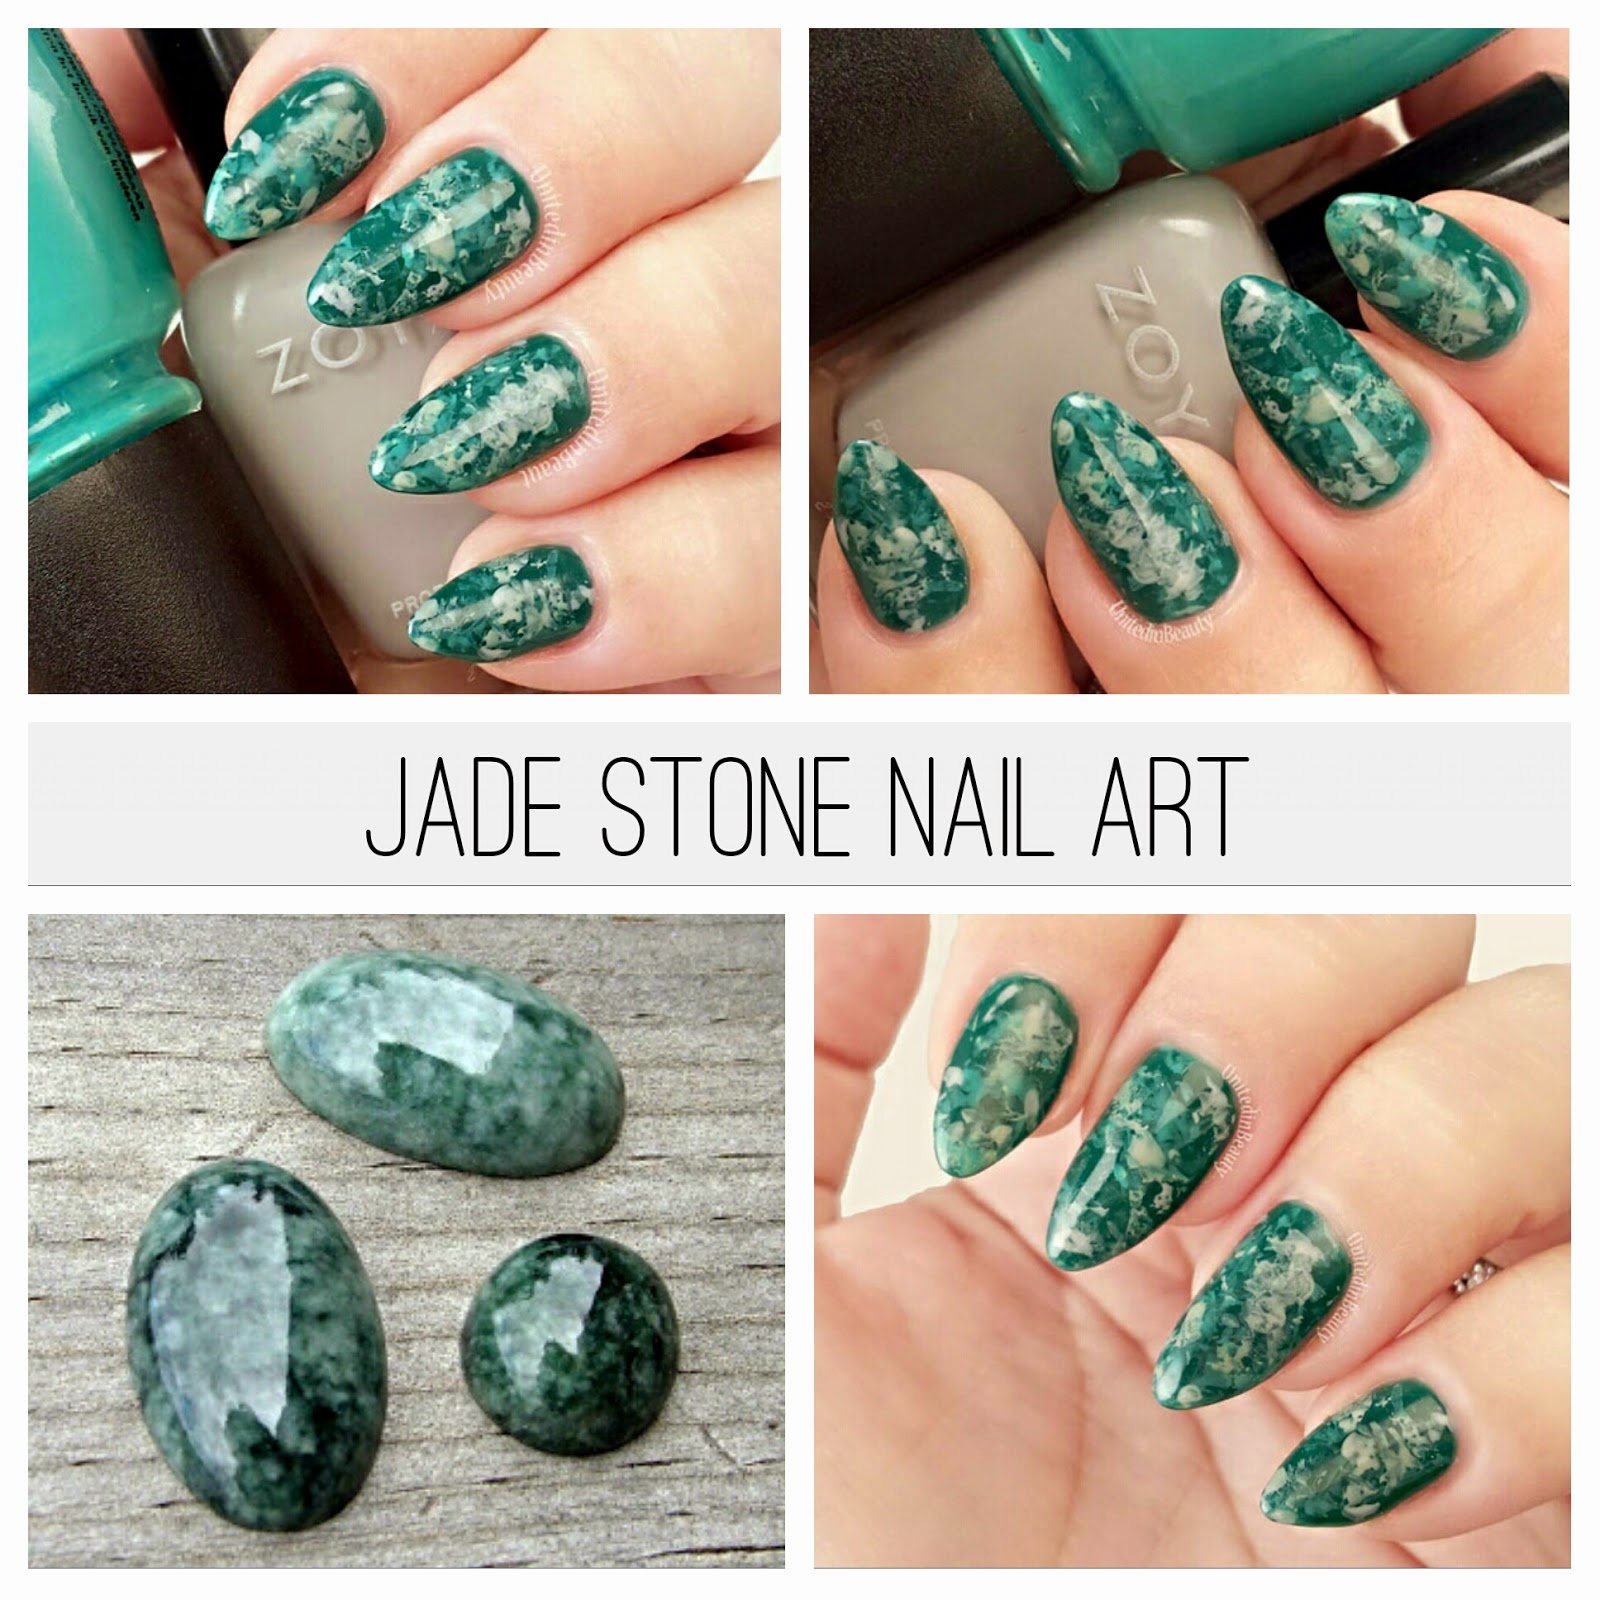
Jade Stone Marble Nails

jade stone marble nails by @unitedinbeauty
Welcome to 2015 everyone! Looks like we all made it, LOL! I've been feeling super inspired by jewelry lately, and I have this gorgeous Jade ring that has just been screaming out for me to recreate on my nails. All in all, I'd say that this is a pretty close match to a real jade stone!
- Polishes  Used -
  • Base Color: Gilty Girl - Jinx
  • Marble Effect: Zoya - Dove and China Glaze - Four Leaf Clover     
- Extras - 
  • Clear Plastic Cling Wrap
Step 1: Begin by applying 2 coats of Jinx by Gilty Girl and allow to dry completely. 
Step 2: Once dry, take a small bunched up piece of clear plastic cling wrap and dip it in a small amount of Zoya Dove. Dab the excess on a napkin, then use a very light hand to dab the polish on to your nails. 
Step 3: Allow the first layer to dry, then repeat the cling wrap process, this time using China Glaze Four Leaf Clover. 
Step 4: Once you are happy with the look of your jade stone marbled nails, apply a coat of Seche Vite Fast Dry Topcoat to mesh the colors together and seal the look.

I'm really into the look of stone nails right now. I might have to try turquoise nails soon, but man that spotted water marble sure is intimidating!

And there you have it! If you are inspired by or recreate this look, I'd love to see it! Use hashtag #HeyUnitedinBeauty on Instagram or send me a tweet on Twitter!

SHARE:

December 31, 2014

Blue and Silver Glitter Gradient Nail Art

Blue and silver glitter gradient by @unitedinbeauty
Omg, WHAT? New Years Eve BONUS POST! Bet you never saw this comin' did you?! I've still got a few tricks up my sleeve now and again. ;) So, in typical fashion if you know me at all you know that I just couldn't ring in the new year without bling and glitter all over my fingertips and hence here we are again!
Blue and silver glitter gradient by @unitedinbeauty
As you may have guessed, the gorgeous blue polish is still Gilty Girl's Brilliant. This polish has been putting in work lately, I've used it so many times since I got it! For the bling, I created the glitter gradient by using a sparkly little gem of a polish called Frost Yourself that I picked up from Icing in the mall. To create the gradient, use the nail polish brush to apply the glitter at the base of the nails, then drag it lightly towards the tips. It's one of my favorite ways to fancy up a manicure because it's so quick and easy! There we have it folks, that's a wrap on 2014! See you on the other side!

Do you have any New Years Eve traditions that you like to follow? I'm off to the casino tonight, wish me luck! I'll need it!
SHARE:

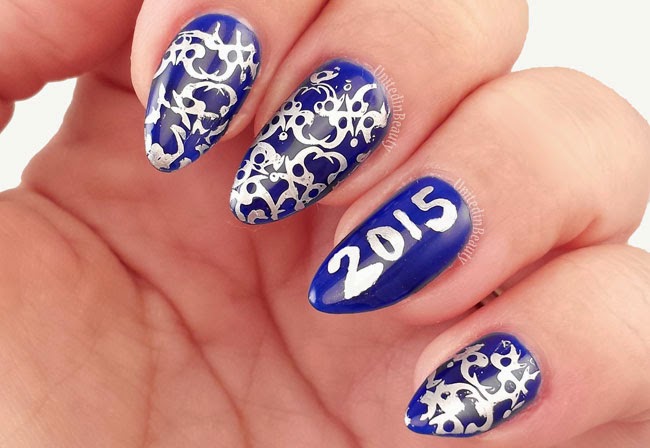
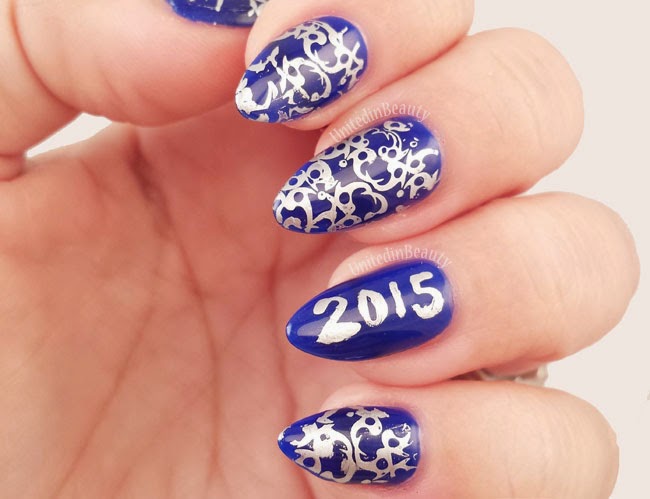
Blue and Silver Filigree Nail Art

Blue and Silver Filigree Nail Art by @unitedinbeauty
Happy New Years Eve Everybody!! Wow, 2014 has flown by! I can't believe it! I'm ready to ring in the new year tonight, and hopefully you all are too! Going to keep this one short and sweet since I know everyone is probably going to party the night away in a few hours. Can't waste precious party energy reading words, now can we?!
Blue and Silver Filigree Nail Art by @unitedinbeauty
For this one, the bright blue base is 3 coats of Gilty Girl-Brilliant. The silver stamping was done with Pueen stamping plate 28, and the polish is by Pure Ice. As always, everything is topped with Seche Vite fast try topcoat. Elegant and fancy, wahoo! I'd love to stay and chat a while, but a girl's gotta get ready and we know that takes some TIME, am I right? I can't wait to rock my new dress and boots tonight and dance the night away!

Have a safe and wonderful NYE everybody! What's your plans for the night? Do you stay in and relax or go out and party 'till dawn?
SHARE:

December 30, 2014

OMG Nail Strips - Pics and Review

Omg nail strips by @unitedinbeauty
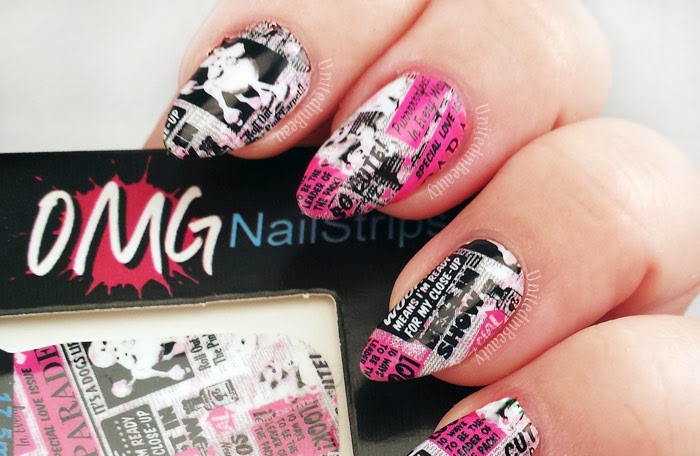
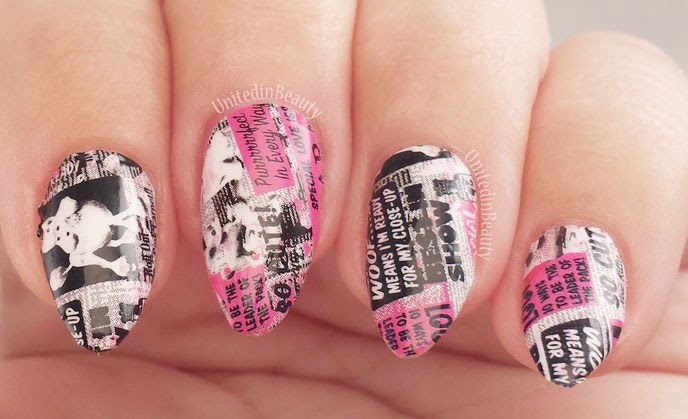
Today I've got more pics and a full review of these OMG Nail Strips as promised, but first can we just talk about how fun this design is? It has a hot pink, black, and white newsprint style background with pictures of little white poodles too. The words say different phrases like "So cute," "Woof means I'm ready for my close up," and "10 ways to be the leader of the pack." Pretty freaking adorable, really.
omg-nail-strips by @unitedinbeauty
I'm a bit of novice when it comes to the world of nail strips, I usually stick to regular old nail polish and nail art, so I was super excited to get to try these out. I've tried a few different types of nail strips before, but I always find that most of them don't seem to fit my apparently very awkwardly shaped fingernails. Nothing is more rage inducing for me than finding a gorgeous design in a nail strip and then finding out there is no way humanly possible that they are going to fit me. The struggle is real, people. 
omg-nail-strips by @unitedinbeauty
I found that the application for these was very simple. To apply them I just peeled off the clear top sheet, then peeled the design away from the paper backing. I used a pair of tweezers to put the design in place on the nail, then I pressed away any air bubbles with a soft cotton bud. I used a small pair of nail scissors to trip the nail strip to fit my nail perfectly. There was very little filing required for me, just a bit to round off the edges, then I applied a nice layer of Seche Vite top coat to finish everything off.

This design and many more can be purchased from OMG Nail Strips for $7.99 per set. Each package contains 14 nail strips in various sizes. Right now you can get 5 sets for $25 with the coupon code 5pack, or 10 sets for $45 with code 10pack, and there is free shipping on all orders. SCORE!

You can follow OMG Nail Strips on Facebook or Instagram for more pics and great deals!
SHARE:

December 29, 2014

Neon Barbie Pink Manicure With Accent Nail Strip

Neon Barbie Pink Nails by @UnitedinBeauty
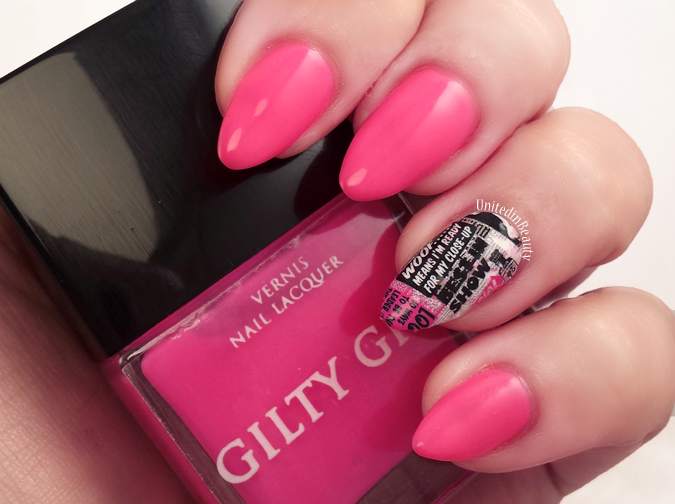
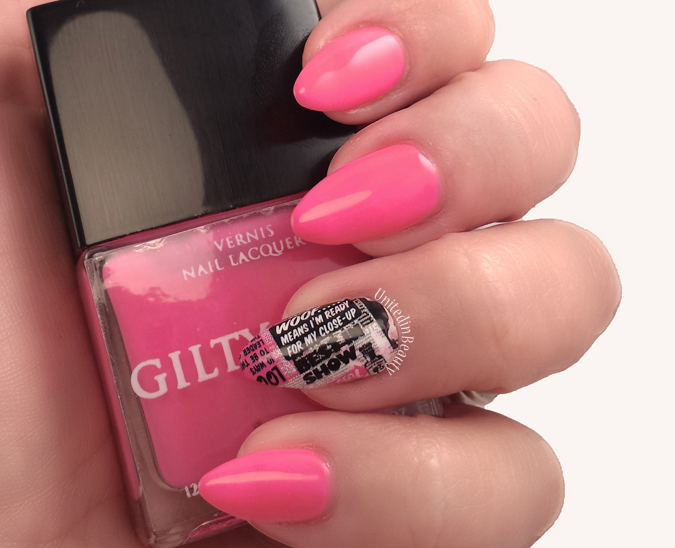
I wasn't planning on doing another manicure this week, but I got a few gorgeous polishes from Gilty Girl in the mail earlier this week (more on that and swatches are coming in a few days) and as soon as I saw it I was just dying to get this neon hot pink color on my nails. I just couldn't resist! I've also been itching to try out my really cute nail strips I got from OMGNailStrips (review on these coming too!), so I was super excited when I put them next to each other and noticed that the two pinks were almost a perfect match!
Neon Barbie Pink Nails by @UnitedinBeauty
Polishes Used: Gilty Girl Cosmetics - Bad Baby, OMG NailStrips, Seche Vite Topcoat
My camera went all kinds of crazy trying to capture the ultimate neonness of this polish! I'd have to say that the 1st picture is very close to the true color in real life. I love how bright and shiny it is, and the pink, black and white newspaper nail strip ended up making the perfect accent nail.
SHARE:

December 27, 2014

Black and White Skull Nail Art

Skull nail art by @unitedinbeauty
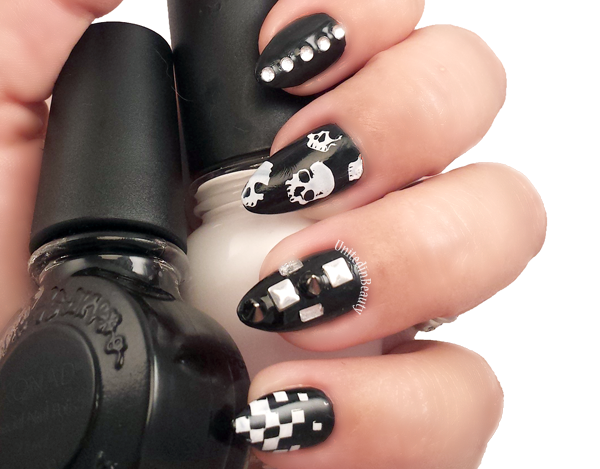
After being surrounded by all the holiday glitz and glam for the past month, I decided today would be a day for total badassery, hence these black and white skull nails were born. There's so much going on here that I love, silver studs, metal spikes, rhinestones and little stamped on skulls. I feel like I should switch into  my alter ego and be playing guitar in a smokey underground club  or something with these nails. Rock on!
Skull nail art by @unitedinbeauty
Polishes Used: Orly-Liquid Vinyl, Konad White, Seche Vite Topcoat
I started out with 2 coats of Orly-Liquid Vinyl and once that was dry I got to work hand placing the studs, rhinestones, and metal spikes. I wish the camera had picked up the spikes better, they are a bit hard to see but in person, but trust me, a complete stranger on the internet - they are the bomb. And if you can't trust complete strangers on the internet then hey, who can ya trust, right?

By the time I finished sassing up the ring and pointer fingers, my polish was dry enough for me to begin the stamping with Konad white stamping polish. The white skulls are from the MASH-29 stamping plate, and the white checkerboard stamp is from the Pueen48 plate. As always, you know I had to give it a good layer of Seche Vite topcoat to give it extra shine and complete the look!
SHARE:

December 23, 2014

White & Gold Flakes with Handpainted Ornament - 12 Days of Christmas Holiday Manicures Day 12

White & Gold Nails with Handpainted Ornament by @unitedinbeauty
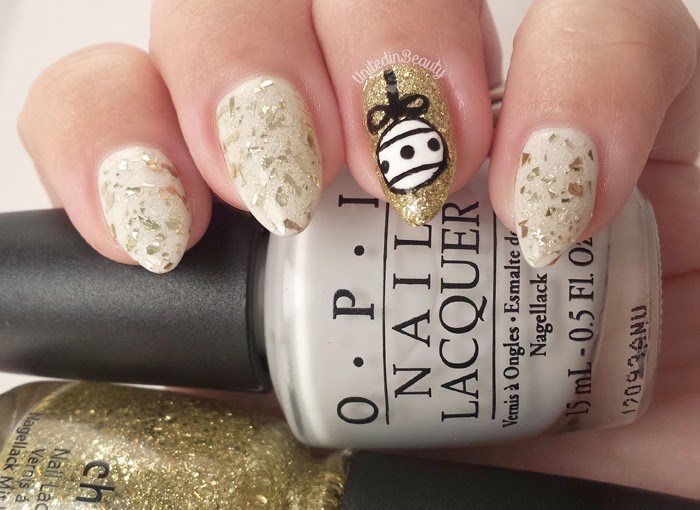
It's the final day of Christmas manicures, can you even believe it? It feels like it went by so fast,  I  have so many more ideas! I either need more days until Christmas, or more nails...  I started with a base of OPI- My Boyfriend Scales Walls, then I decided to go out with a bang today and break out both my handpainting nail art skills AND 18k gold topcoat for this one. I'm so faaaancy!
White & Gold Nails with Handpainted Ornament by @unitedinbeauty
Polishes used: OPI- My Boyfriend Scales Walls & Mariah Carey Pure, China Glaze - Blonde Bombshell, Seche Vite Topcoat   
While I do love the OPI - Mariah Carey Pure 18k gold flake topcoat, I have to admit that the flakes are quite small, which is a bit of a disappointment. It seems like every time I use it I always end up wanting more. The other day while I was out and about, I spotted  Maybelline Color Show Jewels - Gilded in Gold and I just couldn't resist picking it up. These flakes are much bigger, and are exactly what I was hoping for out of the OPI topcoat. By layering both of these polishes, I got exactly the look I was going for.

For maximum blingage, I added a gold accent nail using China Glaze - Blonde Bombshell and used acrylic paint for the hand painted ornament. I gotta admit, the ornament turned out way cuter than I thought it was going to, I'm pleasantly surprised! A nice coat of Seche Vite added so much shine to these it's insane. Can't wait to wear them to my family Christmas party! Well that's a wrap on my 12 Days of Christmas manicures, I hope you enjoyed it as much as I did! In other news, I'm considering trying out video tutorials for my nail art, but I'm honestly just not even sure where to begin,. Let me know down below if you have any tips or tricks for getting started!

What do you think of these gold flakey nails, just enough bling or too over the top?
SHARE:

December 22, 2014

Elegant Red and Gold Ruffian Nails - 12 Days of Christmas Holiday Manicures Day 11

red and gold ruffian nails by @unitedinbeauty
I seriously can't get enough of the sparkles this week, I am obsessed! Is this where I'm supposed to put #sorrynotsorry? There's not too much to say about this one, I think the look really speaks for itself!
red and gold ruffian nails by @unitedinbeauty

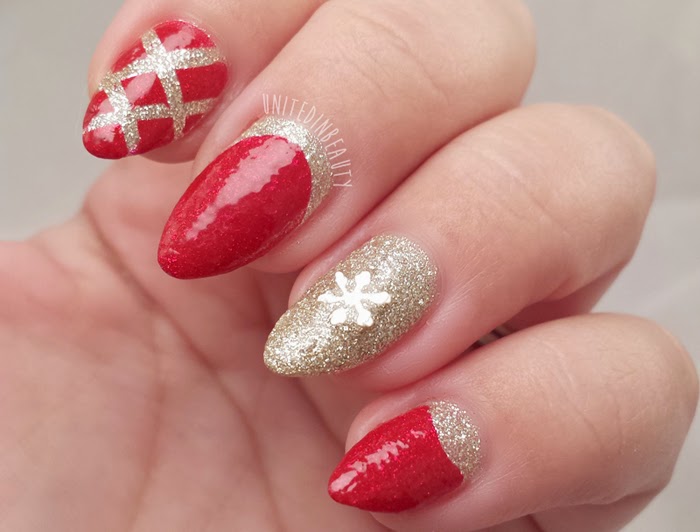
I started out with 2 coats of OPI - My Favorite Ornament, then I used one of my absolute favorite reds for this manicure. The red polish is called Red Cameo by Ruby Kisses. It's not from a hugely popular brand but I will say that it is highly underrated! I got a pleasant surprise today when I realized that the red is slightly jelly and allowed the glitter polish to shine through which made this even more awesome in my opinion.
red and gold ruffian nails by @unitedinbeauty
I used striping tape in a criss-cross pattern to create the look for my index finger and added a tiny snowflake to my ring finger to give this a wintery touch. That's it for today, see you tomorrow!
SHARE:
© United In Beauty. All rights reserved.
Blogger Template by pipdig