Trending

Showing posts with label Gold. Show all posts

December 22, 2014

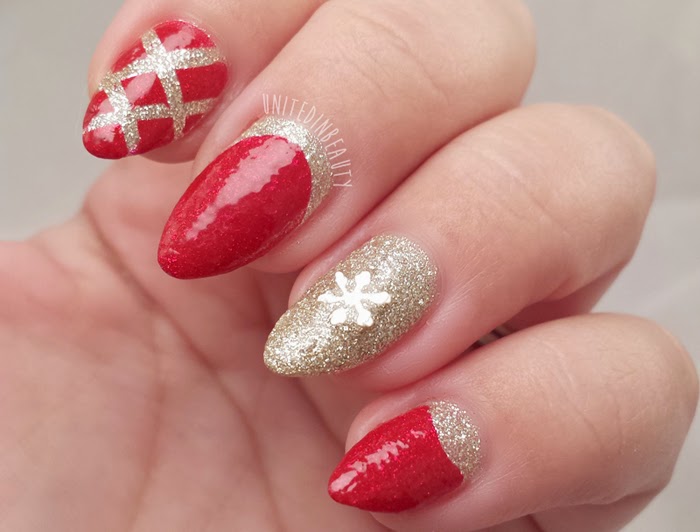
Elegant Red and Gold Ruffian Nails - 12 Days of Christmas Holiday Manicures Day 11

red and gold ruffian nails by @unitedinbeauty
I seriously can't get enough of the sparkles this week, I am obsessed! Is this where I'm supposed to put #sorrynotsorry? There's not too much to say about this one, I think the look really speaks for itself!
red and gold ruffian nails by @unitedinbeauty

I started out with 2 coats of OPI - My Favorite Ornament, then I used one of my absolute favorite reds for this manicure. The red polish is called Red Cameo by Ruby Kisses. It's not from a hugely popular brand but I will say that it is highly underrated! I got a pleasant surprise today when I realized that the red is slightly jelly and allowed the glitter polish to shine through which made this even more awesome in my opinion.
red and gold ruffian nails by @unitedinbeauty
I used striping tape in a criss-cross pattern to create the look for my index finger and added a tiny snowflake to my ring finger to give this a wintery touch. That's it for today, see you tomorrow!
SHARE:

December 19, 2014

Holiday Party Perfection - Look of the Day

Holiday Party Dress by @unitedinbeauty

Holiday Party Perfection by UnitedinBeauty on Polyvore

After thinking on it a bit, I've decided to venture outside of my comfy world of nails and expand the blog a bit by including both beauty and fashion items as well, and here is my first look! I tried to come up with something effortless, yet polished and holiday party appropriate. This entire look is based around my recent 12 Days of Christmas green holographic manicure featuring Color Club - Holiday Splendor. No doubt that green sparkly polish will look amazing with this cute lacy party dress and the green and gold jewelry. 

One of my favorite parts of this look is the cute little clutch, I used to be such a big fan of oversized purses, but now I find a clutch to be so simple and streamlined. Plus it stops me from cramming it full of everything I've ever purchased in the past 10 years! Honestly, a clutch is perfect for tossing in the essentials - an ID, some cash or a credit card, and a lip gloss. No need for a heavy bag, just grab and go!


SHARE:

December 16, 2014

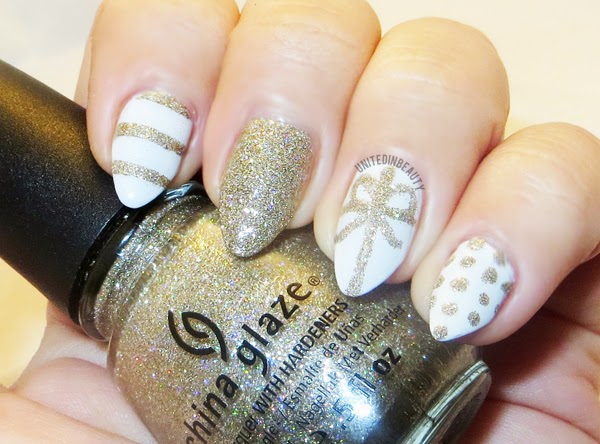
Gold Sparkles with Glittery Bow Accent Nail - 12 Days of Christmas Holiday Manicure Series Day 5

Christmas Present Nails
I've never been a huge fan of gold, but lately I can't seem to get enough of it! This manicure is quick and easy and got a lot of compliments today, which is always a plus, right? I think I may have to bust it out again once it comes time for Christmas parties!
Christmas Present Nails
I started with 3 coats of OPI - My Boyfriend Scales Walls, which I have found to be the perfect off white shade. I've searched high and low for a white that is not too stark, but not too yellow and so far this seems to be it. After that was completely dry, I used striping tape to create the lines on my index finger, and a medium sized dotting tool to make the polka dots on my pinky.
Christmas Present Nails

Maybelline Color Show Jewels Gilded in Gold

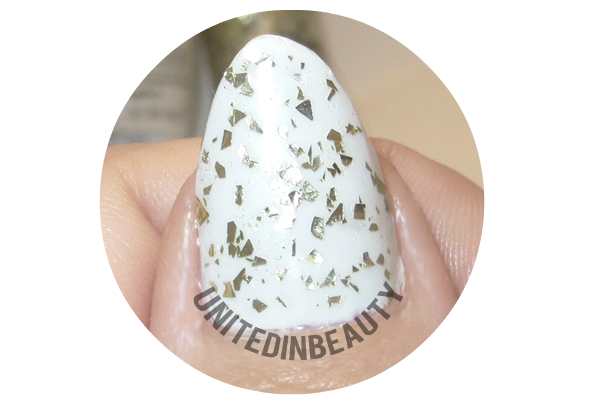
I decided to go full on bling for the middle finger, and used a small nail art brush to draw in the bow accent on my ring finger. Since it was a bit difficult to see in the other photos, I took a close up of my thumbnail and the gold flakes. On my thumb, I used one good coat of Maybelline Color Show Jewels in Gilded in Gold. Well folks, that's it for day 5! See you tomorrow!

How are you all enjoying the 12 days of Christmas Manicures so far? Are there any looks you like to see me create?
SHARE:

February 7, 2013

31 Day Challenge - Day 18: Half Moons

- Gray on Gold Half Moon Manicure -

I am loving today's look
The half moon manicure has been increasing in popularity lately, so I'm happy to hop aboard the love train! I went for a high contrast look by using a medium shade of gray and a bright gold glitter for this design.
Polishes used: China Glaze - Recycle & I'm Not Lion


The great thing about this design is that you can use reinforcement labels as a guide to create the perfect half circle on the nail base. 

After the base coat of polish is dry (in this case the glitter polish) place one of the stickers so that the outside round edge forms the guide for the half circle.

Paint over the sticker, and remove while still tacky/wet for a nice clean line. Tada!
SHARE:
© United In Beauty. All rights reserved.
Blogger Template by pipdig