Trending

Showing posts with label China Glaze. Show all posts

January 11, 2015

China Glaze Mimosas Before Manis - Coral and Black Hearts Nail Art


China Glaze Mimosa Before Manis by @unitedinbeauty

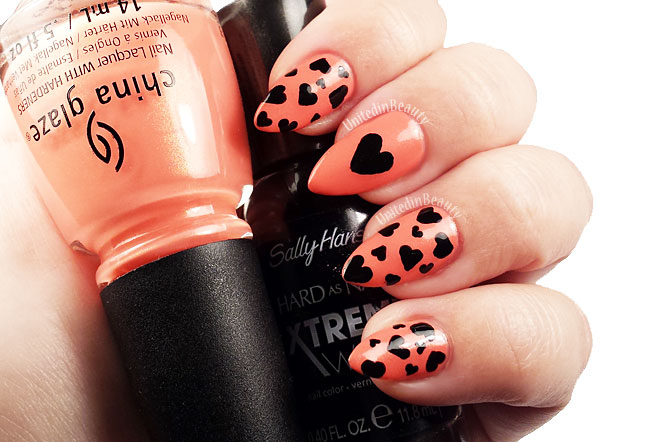
Happy Sunday everyone! I know we're a little over a month away from Valentine's Day, but I picked up this adorable new coral shirt with black hearts the other day and it totally inspired me. I just couldn't resist recreating it on my nails too! It might be a bit early, but I suppose there's never a wrong time for hearts! Besides, soon enough we will all be bombarded with thousands of Valentine's Day heart manicures and there's nothing wrong with being the early bird, is there? After all, they do get the pleasure of eating worms, lucky them! -_-

China Glaze Mimosa Before Manis by @unitedinbeauty
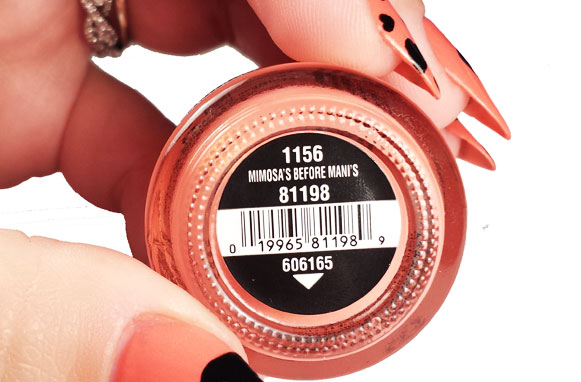
The base polish that I used is two coats of China Glaze Mimosa's Before Mani's. Before I get into the rest of the details, I just have to say that man, typing out those grammatical errors HURT. China Glaze, You got some splanin' to do! Seriously though, take a good look at the next photo. See that? See those big glaring apostrophes that aren't supposed to be there? Believe it or not, the name of the polish really is printed like that. The first time that I saw it, I actually wondered if I received a badly counterfeit nail polish until good ole reliable Google showed me that they somehow meant to print them this way. Grammatically incorrect nail polish names? Can. Not. Deal. China Glaze - Fire whoever the head polish name printer is, and hire this girl right here. 'Nuff said.

China Glaze Mimosa Before Manis by @unitedinbeauty
Rant and horrible grammatical errors aside, let's get back to business. This polish is the bomb. It's an AMAZINGLY PERFECT peachy coral shade that has just a hint of a fabulous gold shimmer to it. My camera had some difficulty picking up the shimmer on my nails,  but if you take a good look at the bottle in my photos you'll be able to see it. I feel like I spent forever last summer trying to find a really great polish in this color. I must have about 10 different peach/pink/corals in my collection now, and I must admit that I love them all.
China Glaze Mimosa Before Manis by @unitedinbeauty
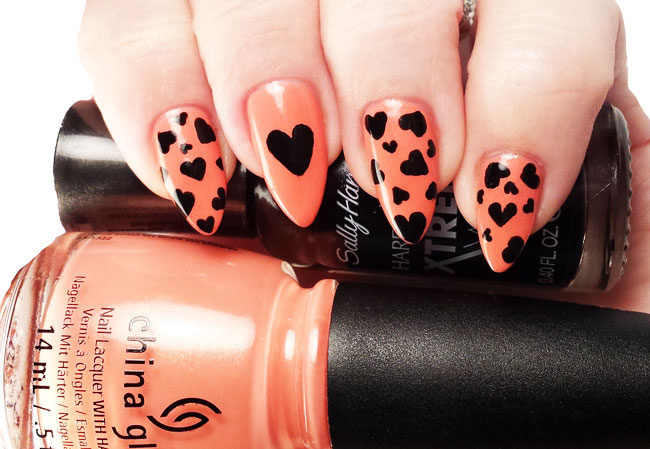
Once the Mimosa's Before Mani's was complete dry, I used my favorite black polish Orly Liquid Vinyl and one of the smallest detail brushes from my Royal and Langnickel RMAJ Detail Brush Set to hand paint the black hearts over top. I let the hearts dry completely to avoid streaking, then topped with Seche Vite Dry Fast Top Coat.

You may have noticed by now that my thumb is a bit camera shy, I often get asked on Instagram what is painted on my thumbnail so I figured today I'd share with you. For this look, my thumb is painted with a black heart on the tip just like the ones in these red heart tipped stiletto nails.

China Glaze Mimosa Before Manis by @unitedinbeauty
 - Polishes  Used -
  • China Glaze - Mimosa's Before Mani's
  • Orly - Liquid Vinyl
  • Seche Vite Dry Fast Topcoat
- Extras - 
  • Dotting Tools
  • Royal and - Langnickel RMAJ Detail Brush Set
I'm not sure if you'll be able to tell, but I've been working on trying to improve my nail photos lately, and I tried a different technique for all of the photos in this post. Can you see a difference? I'd love any tips, tricks or suggestions you might have for me! Did anyone else rage out at the grammatical errors on their Mimosa's Before Mani's polish bottle? As always, don't forget #HeyUnitedinBeauty if you recreate or are inspired. I'd love to see!
SHARE:

December 14, 2014

12 Days of Christmas Holiday Manicure Series Day 3 - Glitter Gradient and Christmas Tree Accent
Christmas Tree Nail Art

Welcome to day 3 of the 12 Day of Christmas Holiday Manicure Series! Whew, that's a mouthful, isn't it? After yesterday's jelly sandwich, I was itching to bust out my nail art brushes and do some work, hence this red and green glitter gradient with sparkly Christmas tree was born.
Christmas Tree Nail Art


The base polish is 3 coats of OPI - My Vampire is Buff, which is a gorgeous creamy nude color. Two coats probably would have been sufficient, but I added another just to be sure that it was completely opaque before starting in with the glitter gradient. 


Christmas Tree Nail Art


Christmas Tree Nail Art


I used striping tape to get the crisp lines in the tiny Christmas tree and added silver balls and a tiny silver star on top for the finishing touch. I dabbed a bit of white flocking powder over white nail polish to create the snowy ground, I'm super bummed that the camera didn't pick up the fact that the snow is fluffy and 3D! Overall, I'm pretty pleased with how this turned out. Stay tuned for day 4!

Polishes Used: OPI - My Vampire is Buff
                         China Glaze - Twinkle Lights
                         China Glaze - Mistletoe Kisses
SHARE:

December 12, 2014

12 Days of Christmas Holiday Manicure Series Day 1 - Red Glittery Santa Hat Tips

Today marks the start of my 12 days of Christmas Holiday manicure series and what better way to start off with a bang than with these adorable Santa hats on my nail tips? For the next 12 days leading up to Christmas I'll be showing you a new holiday themed design. Turns out my new stiletto nail shape came in quite handy for this one. NO REGRETS!

I love that these are festive without being overdone, and on the plus side they are really easy to do. The Santa hats were completely painted freehand with a small art brush. I started by creating just a basic french tip. Once that was fully dry, I used a white polish and a dotting tool to make the fluffy base of the hat. To finish them off, I painted a few swipes of Ruby Pumps again to make the rest of the hat and added a clear gem. Voila!


This design really is perfect for the stiletto shape, but can be done on any nails. If you have square or squoval nails, just make the base of the hat on your nail tip with the point going towards the cuticle and it'll turn out great.

Share your thoughts about Santa hat nail tips. What's your favorite holiday nail design?
SHARE:

December 10, 2014

Glittery Stiletto Hearts - And Debuting My New Nail Shape

Is anyone else as obsessed with stiletto nails as I am right now? I've always been a "squoval" ( square and oval)kind of gal when it comes to my nail shape, but I've got a secret love of stiletto nails. Well, I got a bee in my bonnet the other night and decided I was going for it! Once I had the shape, this seemed like the perfect manicure to go with it.


My favorite thing about this manicure is how quick and easy it was! Two nail colors, a small detail brush and 10 minutes later here we are! This would be super cute for Valentine's Day or even a date night too.


I began by applying my favorite base coat, and once that was dry I began creating the hearts on the tips. I used China Glaze Ruby Pumps for the red hearts and Zoya Storm for the black accent nail.

Polishes Used: China Glaze Ruby Pumps & Zoya Storm

I eyeballed the center line of the nail, and from there created the two arches that would create the heart. Once that was finished, a quick swipe of the brush along the middle and edges completed the look. Topped with Seche Vite topcoat, we're all done! Easy, peasy!


Ruby Pumps has got to be my all time favorite glittery red, it's just so perfect. If you've been searching for that perfect shade, I highly recommend giving this one a try!

Share your thoughts about stiletto nails and this red glittery heart design below. What do you think of the trend? Is it a hit or a miss for you?
SHARE:

November 25, 2014

Bright Ikat Nail Art

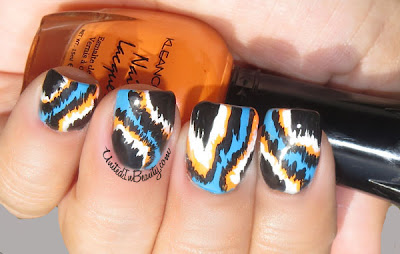
In an attempt to redeem myself after my last nail art snafu, I come to you today with this super fun and super bright ikat nail art! I've never tried ikat nail art before, but now that I have I think I will be doing it a lot more often! I can't stop staring at my nails today!

Ikat nail art design

For this design I started with a base coat of China Glaze - Sunday Funday and let it dry completely. Next, I used a KleanColor-Mango and a small nail art brush to create small flame shaped areas in the corners of each nail.

Ikat nail art design

Next, I added another layer onto the flame shapes using China Glaze - White on White. The great thing about this look is that you can be messy! The key to these steps is to apply the polish with jagged edges, because if the polish splotches are too neat, then the look will not come together properly at the end.

Ikat nail art design

For the last and final step, I used Orly - Liquid Vinyl and created the last layer of black by using my smallest nail art brush and very light jagged strokes. As always, I applied my secret weapon, Seche Vite for my glossy finish!

Ikat nail art design
Polishes used: China Glaze - Sunday Funday & White on White, KleanColor - Mango, Orly - Liquid Vinyl
I really love this color combination! What do you all think, did I redeem myself? ;)


SHARE:

March 26, 2013

China Glaze - Def Defying

- Neon Green With A Side of...Mold? -

I have to admit that the accent nail of this manicure surely looked better in my imagination than it did in real life. I can't help but think that my accent nail looks a little... moldy? None the less, I love the bright neon look of China Glaze Def Defying. 

Of course it may be worthy to note that I love any and all bright colored nail polishes. One of the things I liked best about China Glaze Def Defying is the fact that it looks the same in the bottle and on the nails. Many neon polishes look completely different when applied, but not this one!

China Glaze Def Defying
Polished Used: China Glaze - Def Defying, Orly - Liquid Vinyl and Seche Vite Topcoat.
I started with a nice thick coat of China Glaze Def Defying on all nails and allowed them all to dry fully. Next for the accent nail I painted one coat of Orly Liquid Vinyl on my ring finger, and then proceeded to use small sections of bunched up seran wrap to remove some of the polish while it was still wet. 

By dotting the seran wrap on the wet polish, small sections of the Liquid Vinyl was lifted up, leaving behind the faux marbled effect that I now realize looks strikingly familiar to a sandwich I once left in my Jr. High school locker over the summer.

With the right colors, I think the effect could be stunning though! If there is enough interest, I may be back with a step by step tutorial. 
 

SHARE:

February 10, 2013

Swatch and Learn : Zoya Pixie Dust!


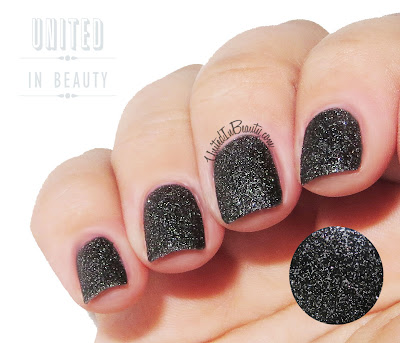
Today I want to bring you some swatches from the brand new Zoya Pixie Dust Collection! Once dry, every polish has a matte sparkle finish with a very textured effect. One thing I learned about myself while swatching these is that I am an EXTREMELY fickle polish lover! 

Every polish I seemed to love more than the last. While each polish was on my nails, it was like no other polish in the world ever existed. I just wouldn't feel right if I didn't warn you, tread lightly with these, you may not ever want to wear another collection again!

 ARE YOU SITTING DOWN?

First up is my personal favorite of the collection - Dahlia. 
I know I know, I already admitted I'm fickle but I have truly deliberated and chose this as the one I love the most. I literally feel as if angels flew down from heaven with crushed black diamonds in their hands and placed them directly on my nails. The picture DOES NOT show the true sparkle of these. They are amaze-balls. Trust me, you want it.
Zoya Dahlia
Zoya - Dahlia
Secondly, I want to show off Godiva. 
The polish is a beautiful pale cream color, and reminds me of sparkly sand from an exotic beach. The sparkle effect is not as intense with Godiva, due to the lightness of the shade. There really isn't enough contrast to let the sparkle shine through at all times, but in the right light it is definitely eye catching.
Zoya Godiva
Zoya - Godiva
Next we have NYX, which is a gorgeous shade of periwinkle.
When it dried, it really reminded me of sugared candy crystals. I love that the color is so perfect for Springtime too! I found that in certain light is has more of a purple tint to it, and in other light it can look slightly more blue.
Zoya NYX
Zoya - NYX
Vespa is a soft muted green that I found just as wonderful as the rest. 
I love that the color is so soft and pastel, at first glace and then the sparkle sets in like BAM!
Zoya Vespa
Zoya - Vespa
The brightest color of the bunch is Chyna. 
I typically don't love the look of red polish on me too much, but once this was on, it won me over. You can really see the texture of the polish in this swatch too. Once dry, it doesn't have a gritty feeling at all like I suspected it would.
Zoya Chyna
Zoya - Chyna
Another favorite of mine from the group is London. 
In general, I LOVE the color gray and this is no exception. London reminds me of a thick fog on a snowy day with the way the sparkle peeks through the polish. I would definitely wear this one on a daily basis, it is simply gorgeous!
Zoya London
Zoya - London
A few words of advice - Definitely make sure to wrap the tips of your nails with this collection. If you forget, you will find it to be very noticeable after it dries. I wrapped each nail and let the polish set for a few minutes, then lightly tapped the edges so that it was all even and patted down. 

Once dry, the glitter does not fall off and it doesn't have a gritty feeling at all like I suspected it would. I actually enjoyed the feeling of running my fingers over the polish!  

When using the Pixie Dust polishes, it is recommended that you apply 2-3 coats without any base or top coat. Applying top coat will nullify the textured finish and give you any entirely new look with a sparkly shine. Basically, you get two polishes in one - Bonus!

The collection sells for $9.00 per bottle and is available now on Zoya.com
SHARE:

31 Day Challenge - Day 21: Inspired By Color

 -Valentine's Heart Manicure -

The theme of the day is inspired by color, so I decided it was the perfect time to "think pink" and take the opportunity to create this soft pretty pink hearts mani just in time for Valentine's Day!

Polishes used: China Glaze - Laced Up & White On White. Stamping plate : Cheeky CH15

SHARE:

February 9, 2013

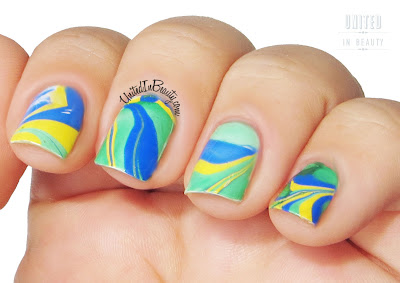
31 Day Challenge - Day 20: Water Marble

- Adventures In Water Marbling With A Side Of Rage -

Well folks, here we have it. The day you've all been waiting for and the day I've been stressing over since the beginning of this challenge. The dreaded water marble technique...
Water marble nails technique
Polishes used: Sally Hansen Xtreme Wear in Pacific Blue & Going Green, China Glaze - Happy Go Lucky
While there is most definitely a strong learning curve, once I got the hang of it I actually found it to be pretty fun. It took a little bit of trial and error, but I have to admit that overall I'm pretty pleased with the results for my first attempt! The process was quite messy, but I'm fairly certain that is partially due to me shrieking with rage face and knocking over my entire setup midway through the process. For your enjoyment, I have included this artists rendering of the events that took place today:

  
If you are thinking of trying this technique, be sure that your water is room temperature or slightly warmer. I found that cold water caused my polish to dry on the surface or sink to the bottom in droplets.  Also, hold your brush close to the water surface when dropping, holding the brush too high above didn't work out for me at all.

Many people recommend using cuticle oil, vaseline or tape around the skin to minimize on cleanup time. But being the rebel that I am, I threw caution to the wind and hit this water marble raw dog. I didn't choose the thug life, thug life chose me.

Give water marble a try, it can really create some brilliant designs!
Check out this great picture tutorial from fellow blogger PolishandPearls.com and let me know if you try this yourself!

SHARE:

February 8, 2013

31 Day Challenge - Day 19: Galaxy Nails


- Glittery Galaxy Nails -

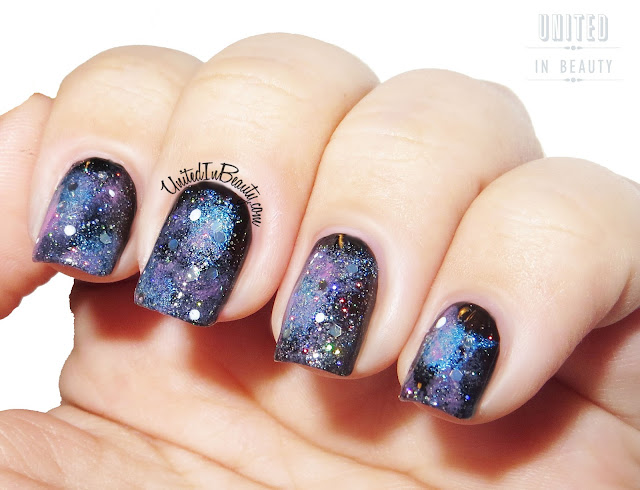
One of the best things about this ongoing challenge is all the new things that I am learning! I have always been a fan of Galaxy nails, but I honestly had no idea that they were so easy!
Galaxy Nails
Polishes used: Orly - Liquid Vinyl & Sweet Peacock, China Glaze - Laced Up, White On White, Fairy Dust & Techno, OPI - I Have A Herring Problem
This was spectacularly easy to create! The only additional tools I used to create this look were a makeup wedge and a small dotting tool.  

While I was working on this design, one of the things that I learned is that you will definitely have better luck with wet makeup wedge than with a dry one. If the sponge is too dry, you may end up with tiny sponge pieces on your nails, which are a pain to pick off! 

The first step is to paint the nails with one coat of black polish. Once dry, I used the wet makeup wedge to begin sponging on a very tiny amount of the blue polish in random areas.
 
There is no need to wait for the blue polish to dry, just go ahead and sponge on a tiny amount of lighter blue/gray polish over the first. You want to keep a light hand with this, or you will cover your original splotches. 

Now it's time to add the pink. You want barely any polish at all on your wet sponge for this, it's only meant to give your galaxy a hint of pink. 

Once all the polish is dry, it's time to add the sparkle. This is where the magic really happens, and each nail begins to look like a real galaxy! I used a very thin layer of fairy dust and was amazed at how good it looked. I also hand placed the glitter from Techo in random areas to look like bright stars in the night sky. I finished off by using my smallest dotting tool dipped in white polish to add one or two randomly placed VERY tiny dots to each nail, which gave a bit more dimension to the finished look.

Topped off with a nice coat of Seche Vite, I've got a super shiny galaxy on each nail! 
SHARE:

February 5, 2013

31 Day Challenge - Day 16: Tribal Print

- Bright and Cheery Tribal Print Madness-

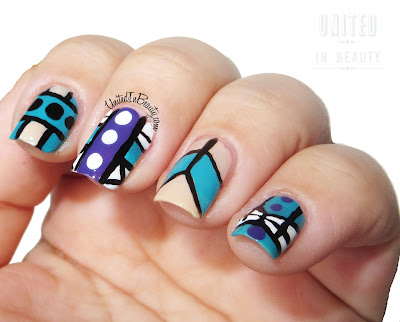
The tribe has spoken! Today I present to you my first and only attempt at tribal print! Not too shabby if I do say so myself! I was inspired by this picture to create this bright colored and cheery tribal look for today's challenge. 
Tribal Print Nails
Polishes used: OPI - Fly, Samoan Sand & Planks A Lot / China Glaze - White on White / Orly - Liquid Vinyl
I've always been very intimidated by the thought of tribal nails, but now that I have conquered them, I will definitely be doing them more often! Honestly, all it takes is a bit of time, a tiny brush, and a creative mind.

 I have found that it works best to have a picture to use for inspiration. Once you start getting creative, it's easy to get off track! The great thing about tribal patterns is the huge amount of variations. There are so many options and you can really let your creativity flow!


SHARE:

February 4, 2013

31 Day Challenge - Day 15: Delicate Print

 - Floral Stamping -
The theme of the day is delicate print, which in my opinion leaves quite a bit of room for interpretation. I decided to interpret it by putting my stamping plates to good use for this white on lavender floral print. Overall, I'm pretty pleased with the exception of my weird looking pinky. Let's pretend that didn't happen.
Polishes used: OPI - Planks A Lot & China Glaze - White on White. Stamping Plate - Mash32

SHARE:

February 3, 2013

31 Day Challenge - Day 14: Flowers

- Pretty Little Garden -

Today's challenge sounds easy enough, just a few little flowers, right? Wrong. As usual, I managed to find a way to turn this into a fail. I though this would be the perfect opportunity to try out my new real dried flowers that I purchased from Ebay. Turns out, not so much...

Floral nails

Floral nails
Polishes used: Orly - Snowcone, China Glaze - Gaga For Green, Holly Day & Lemon Fizz
After a quick coat of Orly Snowcone, I used my smallest nail art brushes to start painting on the blades of grass in two different shades of green. Once dry, it was time to add the decorative flowers. 

As you can see, I quickly nixed the idea of working with the real flowers after they completely fell apart on my fingernails, leaving me with nothing but flower dust and a horrid memory of what had just happened. 

I had no choice but to grab my brushes again and go back to work. I'm no artist, so my flowers look a bit reminiscent of my kindergarten art projects, but they are on there none the less so I'm calling it goal. Day 14, all done!
SHARE:

February 2, 2013

31 Day Challenge - Day 13: Animal Print

- Giraffe Print Nails -
The theme of the day is animal printIn case you've been in hibernation for the Winter, let me be the first to tell you that animal print is all the rage right now and from what I've seen on the popular human behavior documentary called "Jerseylicious", I've also learned that for some it's not just a love, it's an addiction. It seems like everywhere I turn, there's animal print staring back at me. Leopards and cheetahs and zebras, oh my! As usual, I decided to go a bit outside the box and stray away from the common designs, so I busted out my trusty nail art brushes and free-handed these giraffe print nails today!

Polishes used: China Glaze - Lemon Fizz & Over the Taupe
For these, I started out with a simple base of Lemon Fizz. Once dry, I used my smallest nail art brush to start working on the outlines of each of the brown areas. I then used a dotting tool to dab in the brown polish and fill in the spots. Some of the spots needed a second coat and others seemed a little thick, but a nice coat of Seche Vite smoothed everything out nicely!

SHARE:

February 1, 2013

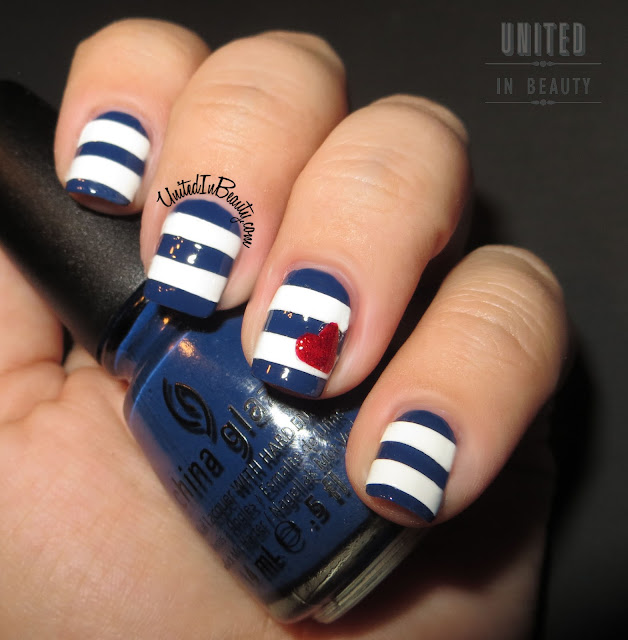
31 Day Challenge - Day 12: Stripes

 -Anchor's Away -

The theme of the day is stripes, and while painting, I totally fell in love with this navy and white striped manicure with glittery heart accent nail. I seem to recall seeing a few different variations on this design before, but I am not exactly sure where it originated.

Striped Nautical Nails
Polishes Used: China Glaze - First Mate, White on White, and Ruby Pumps

In my attempts to simplify the process, it turns out I more than likely ended up making it way more difficult than it had to be. Thanks to my shaky hands, I had to figure out a way to get straight lines, which can be difficult for even the steadiest of digits to freehand. After a little brainstorming, I decided to paint a piece of Scotch tape with white nail polish and cut it into strips of the desired width, then place the stripes directly on the nails.

When it came time to add the heart, I of course had to think of a way to make that more time consuming as well, because everyone knows if it's one thing I have plenty of, it's time.
After laboriously adding the stripes, I couldn't bear the thought of a shaky hand sending it all to hell in a handbasket, so I used a dotting tool to paint the heart on Scotch tape as well, then cut around the design with a pair of nail scissors and put my home made decal in place.

There you have it, after a bunch of unnecessary steps, I'm all finished with day 12!


SHARE:

January 31, 2013

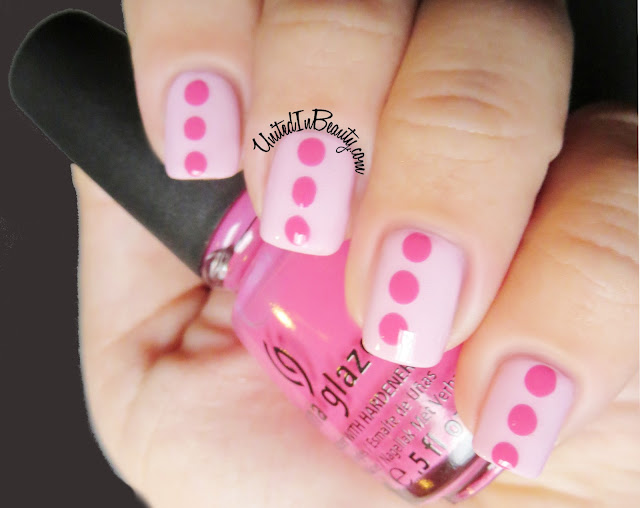
31 Day Challenge - Day 11: Polka Dots

- Pink on Pink Polkas -

I put those dotting tools to good use again today with this simple but adorable pink on pink polka dot manicure. I love the clean look of this, and it was so easy to do! All you really need are a few complimentary polish colors, a large dotting tool and a steady hand, and then there you have it!


Polka dot nails
Polka dot nails
Polishes used: China Glaze - Something Sweet & Happy Go Lucky

SHARE:
© United In Beauty. All rights reserved.
Blogger Template by pipdig