Trending

Showing posts with label OPI. Show all posts

December 14, 2014

12 Days of Christmas Holiday Manicure Series Day 3 - Glitter Gradient and Christmas Tree Accent

Christmas Tree Nail Art

Welcome to day 3 of the 12 Day of Christmas Holiday Manicure Series! Whew, that's a mouthful, isn't it? After yesterday's jelly sandwich, I was itching to bust out my nail art brushes and do some work, hence this red and green glitter gradient with sparkly Christmas tree was born.
Christmas Tree Nail Art


The base polish is 3 coats of OPI - My Vampire is Buff, which is a gorgeous creamy nude color. Two coats probably would have been sufficient, but I added another just to be sure that it was completely opaque before starting in with the glitter gradient. 


Christmas Tree Nail Art


Christmas Tree Nail Art


I used striping tape to get the crisp lines in the tiny Christmas tree and added silver balls and a tiny silver star on top for the finishing touch. I dabbed a bit of white flocking powder over white nail polish to create the snowy ground, I'm super bummed that the camera didn't pick up the fact that the snow is fluffy and 3D! Overall, I'm pretty pleased with how this turned out. Stay tuned for day 4!

Polishes Used: OPI - My Vampire is Buff
                         China Glaze - Twinkle Lights
                         China Glaze - Mistletoe Kisses
SHARE:

December 11, 2014

Glitter Bomb Stilettos - OPI Get Your Number


It's December, which means every weekend is GO GO GO!  In a rush but desperate for a new mani, I decided I needed something simple but eye catching and decided to break out my OPI - Get Your Number from their Liquid Sand collection. 


This is seriously a glitter bomb in a bottle and I couldn't love it more! This is two coats of Get Your Number and one coat of Seche Vite. If you are not familiar, the Liquid Sand collection features glittery matte textured polishes that are gorgeous on their own, but I've found that a nice coat of Seche Vite really takes the sparkle up a notch.

Now that I've got it on my nails, I feel a Christmas stamping manicure coming, so stay tuned!

Share your thoughts about OPI Get Your Number below. Have you tried using textured polishes yet?
SHARE:

December 8, 2014

OPI 50 Shades of Grey Collection - Coming January 2015

Photo: OPI
Get your whips, chains and blindfolds ready! As if the craze from the book and the upcoming movie wasn't enough, OPI has done it again and is back with a 50 Shades of Grey inspired polish collection! Since grey is one of my favorite colors, I do have to admit my supreme disappointment in the fact that there aren't actually 50 shades, but alas these 6 will do. Feast your eyes on these!

 My Silk Tie
Dark Side of the Mood
Romantically Involved
Embrace the Grey
Shine for Me
Cement the Deal
This looks like a gorgeous collection of 5 greys and 1 bright siren red. The collection will be available for purchase January 2015 for a limited time. Both individual bottles and a mini set that contains all 6 together will be offered, perfect for those who like to try before committing to a full size! Each bottle will retail for $9.50.

Share your thoughts about the OPI 50 Shades of Grey collection below. Is this the collection you've been waiting for? Will you by buying in January?
SHARE:

February 5, 2013

31 Day Challenge - Day 16: Tribal Print

- Bright and Cheery Tribal Print Madness-

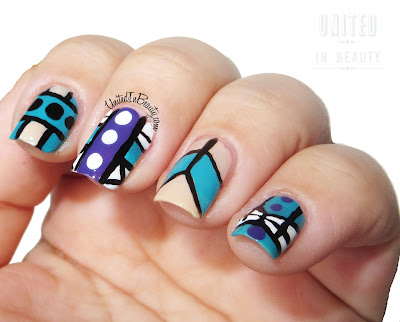
The tribe has spoken! Today I present to you my first and only attempt at tribal print! Not too shabby if I do say so myself! I was inspired by this picture to create this bright colored and cheery tribal look for today's challenge. 
Tribal Print Nails
Polishes used: OPI - Fly, Samoan Sand & Planks A Lot / China Glaze - White on White / Orly - Liquid Vinyl
I've always been very intimidated by the thought of tribal nails, but now that I have conquered them, I will definitely be doing them more often! Honestly, all it takes is a bit of time, a tiny brush, and a creative mind.

 I have found that it works best to have a picture to use for inspiration. Once you start getting creative, it's easy to get off track! The great thing about tribal patterns is the huge amount of variations. There are so many options and you can really let your creativity flow!


SHARE:

February 4, 2013

31 Day Challenge - Day 15: Delicate Print

 - Floral Stamping -
The theme of the day is delicate print, which in my opinion leaves quite a bit of room for interpretation. I decided to interpret it by putting my stamping plates to good use for this white on lavender floral print. Overall, I'm pretty pleased with the exception of my weird looking pinky. Let's pretend that didn't happen.
Polishes used: OPI - Planks A Lot & China Glaze - White on White. Stamping Plate - Mash32

SHARE:

January 30, 2013

31 Day Challenge - Day 10: Gradient Technique


 - Bam! Take THAT, super difficult gradient technique! IN YO FACE! -

For today's challenge I revisited one of my favorite looks with this blue to purple gradient. As much as I love this look, I'm always a little anxious when it comes time to paint. 

This technique can be tricky, polish that is too thick can create strong lines instead of the faded look, and polish that is too thin causes the two colors to overblend. This means a lot of trial and error when it comes to picking out the right polishes, but I have found that the two China Glaze polishes For Audrey and Beach Cruise-r play together very nicely to create a perfect fade!

China Glaze For Audrey
China Glaze - Beach Cruise-R
Polishes used: China Glaze - For Audrey and Beach Cruise-R, O.P.I - Pirouette My Whistle

If you are going to be trying this technique, I do have a few tips to help you along the way:

First, use wax paper to pre-mix your colors. Paint a strip of each color side by side, then use a dotting tool or toothpick to mix them slightly in the middle. 

Next, wet a makeup wedge and ring it out, leaving it damp. Dip the wedge in the polish on the wax paper and pat straight down on the nail, moving up and down slightly. 

Repeat as necessary and finish with a quick dry top coat. 
Once you add the top coat, you will notice how well the colors will blend together!


SHARE:
© United In Beauty. All rights reserved.
Blogger Template by pipdig