Trending

October 26, 2013

Gradient Nail Art With Zoya Rafael Cennamo Spring/Summer 2013 Collection

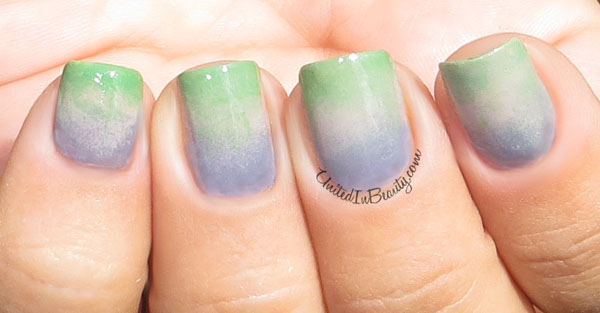
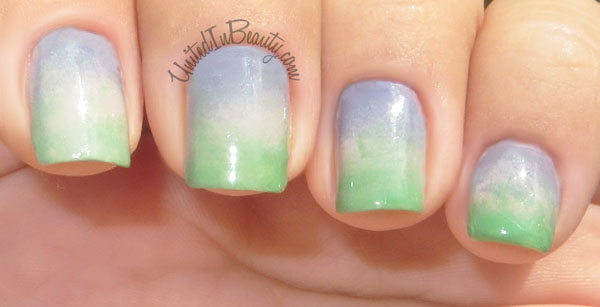
Today I was feeling inspired by the soft color palate of the gorgeous Zoya Rafael Cennamo Spring/Summer 2013 Collection and thought that they would look amazing together. This pretty gradient nail art was done using three of the nail polishes from the new collection. I really love the way the gradient came out, the finished look almost reminds me of a soft watercolor painting.

Gradient Nail Art

In order to create this look, I used three different Zoya polishes and sponged them on to my nail to create the faded gradient design. Zoya Caitlin is at the base of the nail, Zoya Kennedy is in the middle, and Zoya Wednesday is sponged on the tips.


Gradient Nail Art

When using the sponged gradient technique it is common for the result to look a bit thick with noticeable lines of division between color until a top coat is applied, so don't spaz out if you try it and notice it doesn't quite look right yet. No need to freak your freak! I personally almost always use a coat of Seche Vite to smooth out the polish and top off my nails with a glossy finish. 


If you are going to be trying a sponged gradient, you also will want to always keep the sponge damp in order to get the smoothest color blend. I let mine sit in a small cup of water until I am ready to use it. Gradients are so fun! I'd love to hear about your gradients too, what are your favorite colors/polishes to blend together?

SHARE:

May 29, 2013

Nail Art Featuring Zoya Darcy & Josie

Happy Wednesday, friends! To be honest with you, I think mid-week fatigue must be setting in for me today because this color combination and design looked a lot better in my head then it does on my nails, LOL! I'm not even entirely sure what this look is, but alas I shall still present it! Feast your eyes on these shebangys!


This look was done using two coats of Zoya - Josie as a base, then one coat each of China Glaze - White on White and Zoya -Darcy for the design on the nail art. For the shiny finish I used Seche Vite topcoat.


These totally remind me of egg splatters, what do they remind you of? I've just gotta know! What do you see when you look at them?
SHARE:

May 9, 2013

Bloglovin' May Blog Hop!

I wanted to take some time today to feature some fun fellow bloggers that you all may enjoy reading on Bloglovin!

Are you a blogger? Add yourself to the list by following these simple rules.
 
SHARE:

May 7, 2013

Bright Cheetah Print Nail Art

Gathering inspiration from my trip to the local zoo, today I am rocking this super fun and super bright yellow, black and blue cheetah print nail art. Animal prints are some of my favorite designs since they are so eye catching and easy to do. This simple cheetah print design can be created using nail art brushes, dotting tools, or even toothpicks in a pinch. As an added bonus, with cheetah print the color combinations are endless!
Bright Cheetah Print Nail Art
Polishes used: China Glaze - Happy Go Lucky, Ruby Kisses - Teal Envy, Orly - Liquid Vinyl, Wet N' Wild - Silvivor
I'm an old lady now and the zoo wore me the heck out, so I'm just popping in for a quick post today, but if there is enough interest, I may try my hand at putting together a tutorial on how you can re-create this look. Let me know what you think in the comments!


SHARE:

May 5, 2013

Models Own Splash Collection - Coming May 13!

Models Own Splash Collection
Photo: Models Own
Models Own is back to blow our minds with another intensely awesome nail polish set just in time for Summer. The SPLASH collection is described by Models Own as "a completely unique glide-on glitter in gleaming jewel shades" Whether they are worn alone or over another polish as a topcoat, each polish in this collection contains 5 different chunky hand-cut glitters that really up the sparkle factor when out in the sun.
  
The 5 nail polishes included in the Splash Collection are:

Aqua Splash - A crystal ripple of sea blue

Pink Paradise - A precious mix of flickering pinks

Red Sea - A wave of energetic fuchsias-red 

Golden Shores - A warm sandy coral

Mermaid Tears - Enchanting droplets of aqua violet.

I am loving these bright flakie polishes and will most definitely be rockin' them for the summertime! Beginning May 13th, these polishes will be available on the official Models Own Website at £5 each.
SHARE:

May 3, 2013

- Enter to win the ENTIRE Zoya Pixie Dust Collection! -


Zoya Summer Collection Giveaway
If you haven't seen them yet, this collection is AMAZING! 

Want a chance to win them? Subscribe Via GFC in the sidebar & Enter Below!
Not sure how? Let Tiny Einstein show you.
a Rafflecopter giveaway

Eligibility: In order to be eligible you must be a Google Friend Connect follower of UnitedInBeauty.com.
Simply fill out the form below to enter, you can also earn extra entries by tweeting and sharing the giveaway on FB! Winner will be determined by random draw and contacted via email. If no response is received within 24 hours, a new winner will be chosen. Open Internationally.  
Nail Polish Giveaway begins 5/03/13 and ends 6/05/13.


SHARE:

May 2, 2013

ASP Quick Dip Acrylic Kit Review

Even though I have been rockin' my natural nails for many many years now, I got a wee bit of a bee in my bonnet yesterday and decided that I would like to try doing my own acrylic overlays. Easier said than done. After some extensive research which consisted of about 8 minutes of watching YouTube videos, I headed over to my local Sally's.

After some deliberation, I decided that I was going home with this $15 ASP Quick Dip Acrylic Kit. The point of the kit is that it is designed to be easy for beginners since it requires no molding  of the acrylic powder. The instructions state to simply apply a thin layer of glue, dip your finger into the powder, and finish with a spray of the acrylic cure.
. ASP Quick Dip Acrylic Kit
Photo:Aspnail.com
Try it, they say. It'll be fun, they say...
I have to admit, after trying the kit out, I feel like the claim the box made that a full set can be completed in under 25 minutes was a little bit ambitious. Granted that it was my first time, I found the entire process to take close to an hour.  

For a first timer, it was also quite a messy process for me.  I learned as I went along that I had better luck just ignoring the specific instructions that came in the kit and just doing my own thing. The guide says to apply several layers of the glue and powder, but I did best with just 1-2. Also, I lightly tapped the powder down with my finger after dipping. When I didn't, I found the result to be very bumpy.
Naked Nails
BEFORE  
While this is not the best quality, I happened to have snapped this cell phone picture the other day of my naked nails to give you an idea of my starting point.
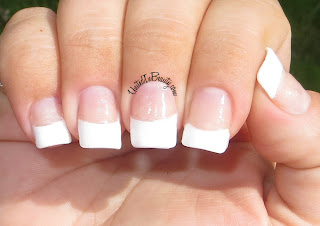
Acrylic nails with french manicure
AFTER
I think that with a little bit of practice, this kit could be very useful for a quick set of nails.
Overall Rating: 3.5/5 GlamourGals
 

SHARE:

April 29, 2013

Zoya Earthday Promo 2013 Haul

 Zoya Earthday 2013 Promo Haul


Zoya - If loving you is wrong, I don't wanna be right...

My Earthday Promo haul arrived today and I couldn't be more pleased with these gorgeous nail polish colors that I picked out! I don't have too many Zoya nail polishes in my collection, and now I see just what I've been missing out on. These will definitely keep me busy with swatching and nail art for a while. Now I've just got to stop admiring them long enough to package up and send back my old toxic polishes! Zoya for the win!

Pictured from left to right:
Micky, Wednesday, Dove, Charisma, Caitlin, Lo, Josie, Thandie, Mira, Ali, Darcy, Rocky, Kelly, Kennedy, and Kieko.
 Zoya Earthday Promo 2013

SHARE:

April 28, 2013

Wet N' Wild Violet and Lavender Color Blocked Nail Art

Today I have a great Springtime look that I put together using two of the new Wet N' Wild Megalast nail polishes - On a Trip and Through the Grapevine. Both of these purple polishes caught my eye and were just too lovely for me to pass up and leave sitting there on the shelf.


I don't have too much experience with the Wet N' Wild brand, so I was a bit surprised when I pulled the cap off and got a good look at the brush. The brush is a bit on the thick side and is also awkwardly shaped in an uneven arch. According to the sticker on the top of the bottle this is called their "ManiCurve Pro Brush," and unfortunately I have to say that I am not a fan at all. I found that the bristles are way too stiff and the brush itself was also too thick, which made polishing a very messy task. For that reason alone, I think I'll be staying clear of the Megalast polishes for a while.


I started this look off by painting my nails with two thin coats of the lighter lavender polish, called On a Trip. If you are recreating this look, you will want to be be absolutely certain that the first layer of nail polish is completely dry before moving on, or you're going to have a bad time. Once the lavender layer had dried completely, I started to move on to the next step.
    
  
Using short strips of manicure tape, first I started by dividing each nail up into four equal quadrants. Next, I used the darker violet color that is called Through the Grapevine to fill in both the top and bottom sections. While the polish was still wet, I pulled the tape off and let the violet sections dry completely. A little pearlized bead glued smack dab in the middle finished off the look, and viola, adorable Springtime color block nail art!


SHARE:

April 26, 2013

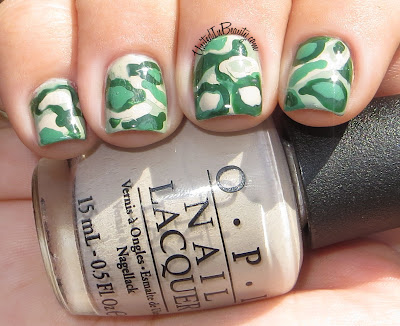
Green Camouflage Nail Art With China Glaze and OPI

Those of you that follow me on Facebook and Twitter may already know that I got a little overanxious yesterday and decided that I was going to leave my nails naked and bare without nail polish until my Zoya Earth Day Promo polishes arrived. Upon noticing that my nail polish order is not due to arrive until the 29th, I suppose that was a bit over-ambitious. 

We all know I can't go that long without painting my nails, I just can't. Based on that and that alone, I present to you my camo inspired manicure for today's nail art look!

Green Camo Manicure Nail Art

I decided to start out with painting a base coat of one of my lesser used polishes, a light Army green color called Kaki by a brand called IrisColors. I found this polish at a small neighborhood beauty supply store a while back and always forget I have it. My apologies that you will probably not be able to locate this exact color easily, but any light Army green will do for this look.


Green Camo Manicure Nail Art

Next, I just used my polish brushes to begin to randomly splotch small areas of the nail in three accent colors, which are:
O.P.I - Did You Ear About Van Gogh? 
O.P.I. Don't Mess With OPI
China Glaze - Holly Day
Camo Nail Art Manicure
Polishes used: OPI - Don't Mess With OPI & Did You Ear About Van Gogh? China Glaze- Holly Days, IrisColors - Kaki
In order to increase the randomness of the splotches, I layered up a few of them. I found that this really helped give my nail art the authentic camouflage look.

At this point, my manicure began to look a bit bumpy from the different layers of polish that I had dabbed on. Not to worry though, one good thick coat of Seche Vite (what I consider to be my miracle topcoat) smoothed everything right out and left me with a high shine glossy finish.

SHARE:

April 24, 2013

Zoya Earth Day 2013 Promo - 50% off polishes!


Have old toxic polishes that you've been meaning to get rid of? Here's your chance! If you are a fan of Zoya, then this is surely enough to make you jump around like a mad woman and possibly even wet your pants; Until April 26, Zoya is offering 50% off on TONS of their nail polishes in exchange for your old, unwanted ones. Does it get any better than that?

Zoya is asking that fans mail back old and unwanted polishes from their collections that may not be BIG5FREE so that they may be disposed of safely and properly. Kudos to Zoya for thinking about both consumers safety and the safety of the environment. All Zoya nail polishes are both Vegan friendly and Big5Free, which means that they do not contain Formaldehyde, Formaldehyde Resin, Toluene, DBP or Camphor - which are all toxic chemicals. 

While the promo is designed to encourage us all to make a move towards healthier beauty products and recycle toxic chemicals properly, Zoya states that the offer is NOT contingent on the customer returning polishes, so anyone can take advantage of this great deal whether you have polishes you'd like to return to them or not.

In order to take advantage of this great deal simply visit Zoya.com, create your account and enter the code ZOYAEARTH2013 at checkout.


SHARE:

April 23, 2013

Zoya Pixiedust Summer Edition Swatches and Review


I finally received my Zoya Pixiedust Summer Edition, and I can definitely say that they arrived not a moment too soon! I don't think I could take much more daily mailbox stalking! Let me tell you, these new polishes are well worth the wait. One of the best things about the Pixiedust nail polishes is the fact that you are really getting two nail polishes in one.

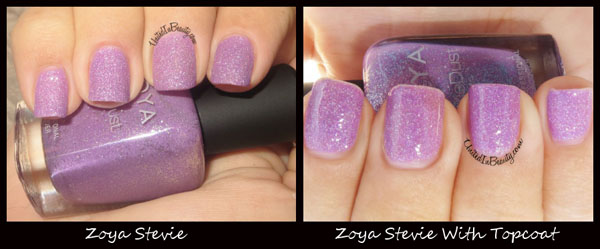
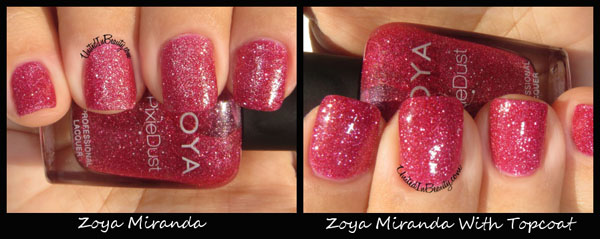
You can use the Zoya Pixiedust Summer Edition as intended (without a base or top coat) and you will be left with a textured, matte, and sugary finish which is very on trend right now; or you may choose to add a topcoat such as Seche Vite, which will bring out all the sparkle and shine of the nail polish collection and give it a high gloss finish. 

For your viewing pleasure, I've snapped a few pics of each of the new Zoya Pixiedust Summer Edition nail polishes, both with and without a topcoat so that you can compare for yourself.

Zoya Pixiedust Summer Edition - Stevie

STEVIE - Stevie is a gorgeous light violet polish with tons of silvery sparkles. This is one of my top pics from the collection for sure, as I would wear it regularly both as a matte and with a glossy topcoat. Once the topcoat is applied, the depth of the polish really starts to shine through. The pretty pastel shade is perfect for Summer, but also demure enough to wear during Spring as well. I know this polish will definitely be in my regular rotation.

Zoya Pixiedust Summer Edition - Liberty

LIBERTY - Liberty is, in a word... gorgeous. I absolutely love the shade of this bright blue nail polish. While I do enjoy it in its natural, matte pixiedust form, I have to admit that I am a complete sucker for what it becomes once I added a topcoat of Seche Vite. The only way to describe it is like having the complete depths of a stunning blue ocean on my fingertips. The sparkle really comes alive with the topcoat, and seems to shift shades when the sunlight hits it from certain angles. This is a must have, and my number one favorite from the collection.

Zoya Pixiedust Summer Edition - Miranda

MIRANDA - Miranda can best be described as a pretty rose colored nail polish with tiny plum undertones. I have always considered myself someone that cannot pull off the look of certain shades of rose polish, but this one seems to go along with my skin just right. Following in the footsteps of the previous Zoya Pixiedust swatches, Miranda is also quite stunning both as a matte Pixiedust and with a shiny topcoat. I loved the way the glitter flakes become more present with the topcoat, but also enjoy the bright and sugary matte finish as well. This particular shade is wonderful for Summer, but would also transition perfectly into Fall.

Zoya Pixiedust Summer Edition - Beatrix

BEATRIX - Beatrix is, in my opinion, one of the ultimate Summer shades. The colors of orange and tangerine are so on trend right now, and this nail polish fits in perfectly. I love how bright and eye catching it is. When applied without topcoat, Beatrix is a lighter tangerine color with hidden sugary sparkles. Once topcoat is applied the shade seems to deepen a bit to a darker and warmer shade of orange, but the color change is well worth the trade for the depth the polish gains. This one would be perfect with a light and airy white outfit for a day out in the Summer sun.

Zoya Pixiedust Summer Edition - Destiny

DESTINY - Destiny is lovely bright color that I would describe as being halfway between a coral and a red. While I do enjoy the overall shade of the nail polish, I'm not so sure that this shade loves me back. I noticed that it seemed to look a bit funny against my particular skin tone, but I think it would look absolutely amazing of I spotted the shade on someone else. I'm not sure if it was just my eyes playing tricks on me, but I kept noticing little golden undertones that were very pretty when the sun would hit my nails and pick up the foil flecks. I can see this color becoming quite popular once the warm weather hits around here.
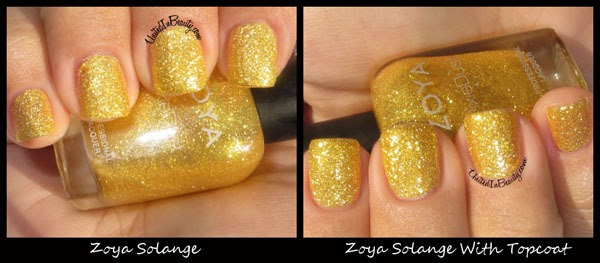

SOLANGE - Solange is the final swatch in the Zoya Pixiedust Summer Edition, and it is definitely last but not least.  Zoya states that this particular nail polish features an exclusive gold pigment, and I'm not sure exactly what that means, but what I do know is that when they say gold, they mean gold. Based on the pictures I saw, I expected this gold metal foil polish to be more yellowy than golden, but it really looks like someone shaved down a bar of gold and planted it right on the tops of my nails. There was not a dramatic difference in the overall look of this polish once I added the topcoat, but it is noticeably different and appears to have more depth, much like the other swatches.

Overall, I'd have to say that Zoya has done it again with the Pixiedust Summer Edition polishes. I'm so glad that I went ahead and purchased the entire collection. I know that I will be putting each and every one of these to good use in the upcoming months. All I know is that Zoya has really set the scene, so I'm hoping they will blow my socks off by creating  fantastic Fall and Winter editions. I can't get enough of the Pixiedust formula, and don't see my obsession fading away anytime soon.

Zoya Pixiedust Summer Edition polishes can be purchased directly on Zoya.com and retail for $9 each.

SHARE:

April 16, 2013

China Glaze Aquadelic and Sinful Colors Lush Life

Today I have two gorgeous blue nail polishes to share with you all! After being on vacation in beautiful, sunny Florida I needed a manicure that would bring some of the beach home with me. This combination of aqua colored nail polish and bright micro and hexagon sparkles definitely did the trick!
China Glaze Aquadelic 
Polishes used: China Glaze - Aquadelic and Sinful Colors - Lush Life. Seche Vite topcoat.
The camera truly can't capture the real life sparkle of this nail polish combo. In the light, the polishes have depth and sparkle just like gorgeously clear water. Perfect for a summer day at the beach! Would you wear this?


SHARE:

March 28, 2013

Metallic Blue On Black Laser Tape Nail Art


Today's manicure is a fun metallic blue on black look that was made with laser tape. Originally, I had planned to place the tape, paint a second color over the top and then remove the tape to reveal different colored polish lines but once I put the tape on, I liked the look of this nail art and decided to skip the other steps.
Polishes Used: Orly - Liquid Vinyl, Seche Vite Topcoat, Blue Laser Tape
This nail art is pretty simple to create. Begin by painting the nails a base color (I used Orly - Liquid Vinyl), and allow to dry completely. Next, pick a colored laser tape and place strips in a random pattern across the nails. Snip the ends using a cuticle nipper and viola!


SHARE:

March 26, 2013

China Glaze - Def Defying

- Neon Green With A Side of...Mold? -

I have to admit that the accent nail of this manicure surely looked better in my imagination than it did in real life. I can't help but think that my accent nail looks a little... moldy? None the less, I love the bright neon look of China Glaze Def Defying. 

Of course it may be worthy to note that I love any and all bright colored nail polishes. One of the things I liked best about China Glaze Def Defying is the fact that it looks the same in the bottle and on the nails. Many neon polishes look completely different when applied, but not this one!

China Glaze Def Defying
Polished Used: China Glaze - Def Defying, Orly - Liquid Vinyl and Seche Vite Topcoat.
I started with a nice thick coat of China Glaze Def Defying on all nails and allowed them all to dry fully. Next for the accent nail I painted one coat of Orly Liquid Vinyl on my ring finger, and then proceeded to use small sections of bunched up seran wrap to remove some of the polish while it was still wet. 

By dotting the seran wrap on the wet polish, small sections of the Liquid Vinyl was lifted up, leaving behind the faux marbled effect that I now realize looks strikingly familiar to a sandwich I once left in my Jr. High school locker over the summer.

With the right colors, I think the effect could be stunning though! If there is enough interest, I may be back with a step by step tutorial. 
 

SHARE:

March 24, 2013

Swatch Alert - Revlon Girly

Recently I was lucky enough to come across Revlon Girlie during my mini haul at Rite Aid and I just couldn't resist scooping it up. Let me tell you, boy am I glad that I did! It is definitely deserving of it's name, this polish is such a pretty light purple and so packed with glitter to boot. I'll let the picture speak for itself.

Now I know I told you I'd let the picture speak for itself, but I just can't resist saying a few words on its behalf. Revlon Girly is like an amazing jelly sandwich in a bottle. 

For those that are not familiar with this term, in the wide world of nail polish, a jelly sandwich is a fun manicure style that consists of a layer of sheer polish, then a layer of sparkly glitter, and then another layer of sheer polish to top it off. If you're looking for all of the jelly sandwich results with none of the homemade jelly sandwich work, here it is!


SHARE:

March 22, 2013

Sweets For Feet Foot Cream

Lately, in my attempt to prepare for the upcoming flip flip weather, I've been putting in a serious effort in order to make my feet look more model like and less Fred Flintstone like. With this in mind, this package from Sweets For Feet could not have possibly come at a better time!

Firstly, I need to address how insanely adorable the box was. I was expecting the package to arrive in the typical brown box stuffed with packing peanuts, so finding this bright pink box with a tiny foot sticker on the top sure was a welcome surprise!

Sweets for feet foot cream


As if it was possible to be any cuter, I opened the pink box to find this adorable silky drawstring pouch waiting for me with all of the foot creams inside!


Once I took a minute to take in all the cuteness, I was able to spread the foot creams out and start sniffing and testing. My sample pack included five 1oz jars of Baklava, Buttercream Dream, Ginger Spice Cookie, Sugah Free (unscented), and Lemonade Cake scented foot creams. I found the 1oz jars to be the perfect size for testing, too.


Being half Greek, I figured I'd be doing a disservice to the entire country if I didn't start with the Baklava scented cream.


I absolutely adored the scent of this cream. It was the perfect mix of honey and lemon. Although it smells delicious, I do have to admit that it would come in second against my Mom's baklava in a sniffing contest! (Hi, Mom!)

Next up was the Ginger Spice Cookie cream.

As expected, as soon as I opened the container I got hit right dab in the nose with the awesome smells of ginger spice. I love spice scented items, pumpkin spice, ginger spice, monkey butt spice, it doesn't matter. If it says spice, I seem to love it, and this was no exception. It honestly smelled as if fresh cookies were being baked, aside from the hunger inducing effect it has on me, this one was a winner.

Working my way through the samples, I was anxious to try Lemonade Cake as well.

When I first opened the container of Lemonade Cake, it was very easy for me to smell the lemon scent, but it seemed to float away in the air soon after. I'm a big fan of lemon scented beauty products, so for me I would have loved it to be a bit more lemon scented and longer lasting. While I couldn't smell the lemon for too long, it did leave the skin smelling very fresh and citrus scented.

Next up, it was time to put Buttercream Dream to the test.

I loved the sugary sweetness of the scent of this cream. The cream smelled mostly of brown sugar to me, though I could also pick up some hints of vanilla. This was another one that made me hungry. This seems to be an ongoing theme for me, so these could be dangerous for my diet!

Last up to bat is Sugar Free, the old reliable unscented cream.

This one has all the great benefits of all the other creams, but is perfect for someone that prefers unscented products or has allergies. Since the cream is all natural, it makes an excellent choice. I found the quality of this cream to be just as nice as its scented counterparts, so if you are like me you may prefer scented creams but don't count this one out just yet!

Overall, I loved the way that these creams felt on my skin. They soaked in well and were not sticky or greasy, which seems to be a problem with a lot of foot creams. The scents continued to last for quite some time as well. Honestly, the packaging was adorable, the creams were fantastic and the customer service of Sweets For Feet couldn't be beat. They were excellent in helping me track down the package after it had gone MIA at the local post office. After using these nightly for a week, I did notice that my feet are very soft and smooth. Flip flops, here I come!

Overall Rating: 4/5 GlamourGals

SHARE:

March 14, 2013

Ruby Kisses - Teal Envy

Thanks to a one day warmup here, I got a major megadose of Spring fever this week. I decided it was definitely time to bust out and dust off some of my trusty brights. Out of all of them, Ruby Kisses Teal Envy is one of my absolute faves! This color is the most perfect shade of bright blue I could ever dream of, pictures simple to do not it justice. Once I found it, I immediately went and bought 5 backups. If you're into brights like I am, this is a MUST HAVE!


Ruby Kisses Teal Envy

SHARE:

March 10, 2013

Contest/Giveaway Roundup


I'm back with another roundup of a few fellow blogs that are currently hosting giveaways! There are some really great things up for grabs, so be sure to visit and enter!

  •  You may also want to enter  Aye Lined Valentine's Day Blog Giveaway!  This great giveaway started on Valentine's Day and is just about to wrap up. The prize pack has a ton of beauty products and includes an Essie polish as well.  Ends March 14, 2013 and is open Internationally
  • Finally, be sure to head on over to Makeuprshutup's 100 Follower Giveaway and check out the mini kit from Lit Cosmetics she has up for grabs. The giveaway ends as soon as she hits 100 blog followers and is open Internationally.
There we have it, our contest/giveway roundup for the week of March 10 - March 17!


SHARE:

March 8, 2013

And The Winner Is....


Congrats to Kari H. for winning our latest giveaway! She will be receiving the entire PixieDust Collection! Stay tuned and don't miss out on our next giveaway!

 
SHARE:

March 7, 2013

Zoya Pixie Dust Returns With A Brand New Summer Collection

Ermagerd! Is it true? Is this real life?
Zoya PixieDust
Photo:Zoya
Zoya PixieDust is back with a brand new summer line full of bright cheery colors. SHUT. UP. AND. TAKE. MY MONEY. I am a HUGE fan of the PixieDust line, which I previously reviewed and swatched for you all here. I will definitely be first in line for these!
 
According to the Press Release, here is a description of all the upcoming shades.


Zoya PixieDust Summer Collection
 
ZP681 - Liberty: Blue sparkle, exclusive Zoya PixieDust Matte Sparkle formula.


ZP675 - Stevie: Violet sparkle, exclusive Zoya PixieDust Matte Sparkle formula.

ZP682 - Miranda: Rose sparkle, exclusive Zoya PixieDust Matte Sparkle formula. 

ZP676 - Destiny: Coral Metal sparkle, exclusive Zoya PixieDust Matte Sparkle formula.

ZP677 - Beatrix: Tangerine Metal sparkle, exclusive Zoya PixieDust Matte Sparkle formula. 
 
ZP683 - Solange: Gold Metal sparkle, exclusive Zoya PixieDust Matte Sparkle formula with  an exclusive pigment.

The summer collection will be available on Zoya.com beginning on April 1, 2013.

 Zoya Pixiedust Summer


SHARE:
© United In Beauty. All rights reserved.
Blogger Template by pipdig