Trending

Showing posts with label Reviews. Show all posts

May 2, 2013

ASP Quick Dip Acrylic Kit Review

Even though I have been rockin' my natural nails for many many years now, I got a wee bit of a bee in my bonnet yesterday and decided that I would like to try doing my own acrylic overlays. Easier said than done. After some extensive research which consisted of about 8 minutes of watching YouTube videos, I headed over to my local Sally's.

After some deliberation, I decided that I was going home with this $15 ASP Quick Dip Acrylic Kit. The point of the kit is that it is designed to be easy for beginners since it requires no molding  of the acrylic powder. The instructions state to simply apply a thin layer of glue, dip your finger into the powder, and finish with a spray of the acrylic cure.
. ASP Quick Dip Acrylic Kit
Photo:Aspnail.com
Try it, they say. It'll be fun, they say...
I have to admit, after trying the kit out, I feel like the claim the box made that a full set can be completed in under 25 minutes was a little bit ambitious. Granted that it was my first time, I found the entire process to take close to an hour.  

For a first timer, it was also quite a messy process for me.  I learned as I went along that I had better luck just ignoring the specific instructions that came in the kit and just doing my own thing. The guide says to apply several layers of the glue and powder, but I did best with just 1-2. Also, I lightly tapped the powder down with my finger after dipping. When I didn't, I found the result to be very bumpy.
Naked Nails
BEFORE  
While this is not the best quality, I happened to have snapped this cell phone picture the other day of my naked nails to give you an idea of my starting point.
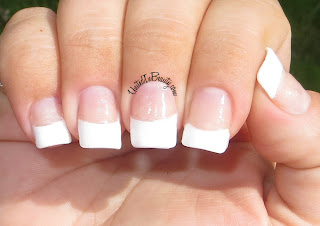
Acrylic nails with french manicure
AFTER
I think that with a little bit of practice, this kit could be very useful for a quick set of nails.
Overall Rating: 3.5/5 GlamourGals
 

SHARE:

March 22, 2013

Sweets For Feet Foot Cream

Lately, in my attempt to prepare for the upcoming flip flip weather, I've been putting in a serious effort in order to make my feet look more model like and less Fred Flintstone like. With this in mind, this package from Sweets For Feet could not have possibly come at a better time!

Firstly, I need to address how insanely adorable the box was. I was expecting the package to arrive in the typical brown box stuffed with packing peanuts, so finding this bright pink box with a tiny foot sticker on the top sure was a welcome surprise!

Sweets for feet foot cream


As if it was possible to be any cuter, I opened the pink box to find this adorable silky drawstring pouch waiting for me with all of the foot creams inside!


Once I took a minute to take in all the cuteness, I was able to spread the foot creams out and start sniffing and testing. My sample pack included five 1oz jars of Baklava, Buttercream Dream, Ginger Spice Cookie, Sugah Free (unscented), and Lemonade Cake scented foot creams. I found the 1oz jars to be the perfect size for testing, too.


Being half Greek, I figured I'd be doing a disservice to the entire country if I didn't start with the Baklava scented cream.


I absolutely adored the scent of this cream. It was the perfect mix of honey and lemon. Although it smells delicious, I do have to admit that it would come in second against my Mom's baklava in a sniffing contest! (Hi, Mom!)

Next up was the Ginger Spice Cookie cream.

As expected, as soon as I opened the container I got hit right dab in the nose with the awesome smells of ginger spice. I love spice scented items, pumpkin spice, ginger spice, monkey butt spice, it doesn't matter. If it says spice, I seem to love it, and this was no exception. It honestly smelled as if fresh cookies were being baked, aside from the hunger inducing effect it has on me, this one was a winner.

Working my way through the samples, I was anxious to try Lemonade Cake as well.

When I first opened the container of Lemonade Cake, it was very easy for me to smell the lemon scent, but it seemed to float away in the air soon after. I'm a big fan of lemon scented beauty products, so for me I would have loved it to be a bit more lemon scented and longer lasting. While I couldn't smell the lemon for too long, it did leave the skin smelling very fresh and citrus scented.

Next up, it was time to put Buttercream Dream to the test.

I loved the sugary sweetness of the scent of this cream. The cream smelled mostly of brown sugar to me, though I could also pick up some hints of vanilla. This was another one that made me hungry. This seems to be an ongoing theme for me, so these could be dangerous for my diet!

Last up to bat is Sugar Free, the old reliable unscented cream.

This one has all the great benefits of all the other creams, but is perfect for someone that prefers unscented products or has allergies. Since the cream is all natural, it makes an excellent choice. I found the quality of this cream to be just as nice as its scented counterparts, so if you are like me you may prefer scented creams but don't count this one out just yet!

Overall, I loved the way that these creams felt on my skin. They soaked in well and were not sticky or greasy, which seems to be a problem with a lot of foot creams. The scents continued to last for quite some time as well. Honestly, the packaging was adorable, the creams were fantastic and the customer service of Sweets For Feet couldn't be beat. They were excellent in helping me track down the package after it had gone MIA at the local post office. After using these nightly for a week, I did notice that my feet are very soft and smooth. Flip flops, here I come!

Overall Rating: 4/5 GlamourGals

SHARE:

March 5, 2013

Jamberry Nail Wraps

Decided to try some new things this week now that the 31 day challenge is behind me. I've never had any experience with nail wraps before, so now seemed as good of a time as any to give it a go! There are a ton of nail wrap brands out there, but I decided to dip my toe in the water with this Turquoise and Silver Crosscross design by Jamberry Nail Shields.
Jamberry
Jamberry Nails - Turquoise & Silver Crisscross (CC02)


For having zero experience, I actually found these pretty easy to use! I have to admit that I didn't follow the directions exactly though. I sized each wrap to my finger, and cut the ends off first. I have medium length nails and I could easily get 2 uses out of the kit. The instructions said to use a blow dryer to heat each wrap for 5-10 seconds but I found that they didn't get tacky until around 20+ seconds, so I heated mine a bit longer.

Once they were sized and heated, it wasn't difficult to apply them. I didn't have any trouble with air bubbles or anything after using my other hand to smooth them. The final step was to file the tips to remove the extra wrap ends. The extra wrap didn't file off as easily as I'd hoped, and I accidentally filed a bit of one of my nails down - OOPS!

I kept the wraps on for 48 hours, and they held up nicely. Definitely going to try these again when I need an easy nail design in a hurry!


SHARE:

January 23, 2013

Sally Hansen Salon Manicure Cuticle Eraser + Balm

Over the weekend I realized I was completely out of cuticle cream and almost completely out of the Vaseline I had been using as a backup, so as part of my weekend mini haul I picked up some Sally Hansen Cuticle Eraser + Balm from Wal-Mart. 

Typically, I'm a bit of a penny pincher when it comes to cuticle creams, but I felt like a little splurge and went for it even though it rang up at a hefty $7.49. As soon as I got home, I couldn't wait to tear open the box and try it (hence why you are seeing stock photos right now) and let me tell you... IT WAS WORTH EVERY PENNY. 

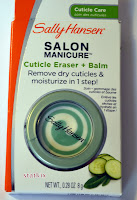
Sally Hansen Cuticle Eraser + Balm

Sally Hansen Cuticle Eraser + Balm

Sally Hansen Cuticle Eraser + Balm


Firstly, I think it goes without saying that the green and white swirls of this product are freakin' adorable. Can we all just agree on that? We can? Good. One of my favorite things about it is the fact that it is non greasy and doesn't take long for your skin to absorb it, although after my acetone use this afternoon, I think my skin was begging for it!  The smell is nice, sort of a mix between fresh cucumbers and watermelon... 

I keep catching myself smelling my fingertips. (Which I'm sure is a joy for others to witness.) I immediately noticed a difference in my cuticles, they went from worn out and ragged to smooth and nourished. This will definitely be a daily use product for me, so if you have been debating on whether or not to add this to your beauty regimen, then I seriously suggest you stop hesitating and go for it. I am adding it to my list of beauty must-haves!


SHARE:

January 21, 2013

Sinful Colors Sinfully Magnetic - Polar Opposites


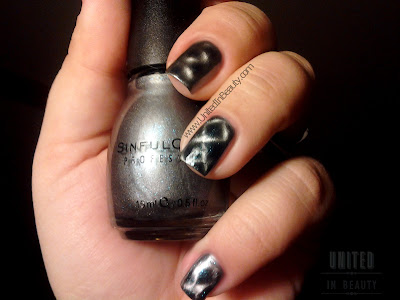
Honestly, I would be lying if I said I wasn't a bit disappointed in this Sinful Colors magnetic polish. It simply just did not meet my expectations, and all I really expected was for it to look somewhat like the advertisement. Admittedly, I am a novice user of magnetic polishes, but I personally believe that nail polish should not be something that requires expertise. 

I know you're thinking, "Oh, it can't be that bad... show us!" but trust me, it is. It's B-A-D, bad. Bad enough I even thought to myself I must have done something wrong and ended up taking all the polish off and trying again not once, not twice, but THRICE times. (Yes, that's the fancy way of saying three) Each result was pretty much the same, meh.

Since we're all friends here, I'm going to share my embarrassment with you. Trust me, I'm only doing this for you, if it were anyone else, no way Jose! Look below at your own risk!
 Sinful Colors - Polar Opposites
 Sinful Colors - Polar Opposites
 Sinful Colors - Polar Opposites


Follow my blog with Bloglovin
SHARE:
© United In Beauty. All rights reserved.
Blogger Template by pipdig