Trending

February 4, 2013

Indie Alert - Model City Spring 2013 Collection

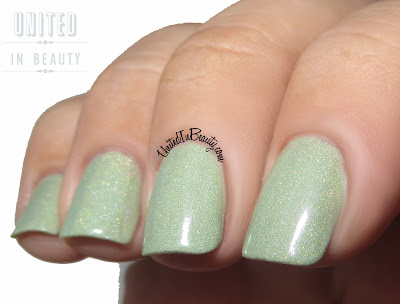
I am so glad that I finally got a chance to swatch the brand new Spring 2013 collection from Model City! These polishes look amazing in the bottle, but I had no idea just how amazing they were until I got them on my fingers. The holographic effects are amazing, and the pastels are perfect for Spring! For full opacity, I used 3 coats of each polish and then finished with a Seche Vite topcoat.

Model City Polish
{Pretty In Pink}
Model City Polish
{You Blue Me Away}


Model City Polish
{I Lilac What You Did There}
Model City Polish
{Orange You Just Peachy}
Model City Polish
{Anti Establish Mint}
Model City polishes are available in two sizes. Mini ($4.00) and Full ($8.00) and can be purchased via Esty. Keep up with latest Model City news on Facebook, and on their official blog.
SHARE:

31 Day Challenge - Day 15: Delicate Print

 - Floral Stamping -
The theme of the day is delicate print, which in my opinion leaves quite a bit of room for interpretation. I decided to interpret it by putting my stamping plates to good use for this white on lavender floral print. Overall, I'm pretty pleased with the exception of my weird looking pinky. Let's pretend that didn't happen.
Polishes used: OPI - Planks A Lot & China Glaze - White on White. Stamping Plate - Mash32

SHARE:

February 3, 2013

31 Day Challenge - Day 14: Flowers

- Pretty Little Garden -

Today's challenge sounds easy enough, just a few little flowers, right? Wrong. As usual, I managed to find a way to turn this into a fail. I though this would be the perfect opportunity to try out my new real dried flowers that I purchased from Ebay. Turns out, not so much...

Floral nails

Floral nails
Polishes used: Orly - Snowcone, China Glaze - Gaga For Green, Holly Day & Lemon Fizz
After a quick coat of Orly Snowcone, I used my smallest nail art brushes to start painting on the blades of grass in two different shades of green. Once dry, it was time to add the decorative flowers. 

As you can see, I quickly nixed the idea of working with the real flowers after they completely fell apart on my fingernails, leaving me with nothing but flower dust and a horrid memory of what had just happened. 

I had no choice but to grab my brushes again and go back to work. I'm no artist, so my flowers look a bit reminiscent of my kindergarten art projects, but they are on there none the less so I'm calling it goal. Day 14, all done!
SHARE:

February 2, 2013

31 Day Challenge - Day 13: Animal Print

- Giraffe Print Nails -
The theme of the day is animal printIn case you've been in hibernation for the Winter, let me be the first to tell you that animal print is all the rage right now and from what I've seen on the popular human behavior documentary called "Jerseylicious", I've also learned that for some it's not just a love, it's an addiction. It seems like everywhere I turn, there's animal print staring back at me. Leopards and cheetahs and zebras, oh my! As usual, I decided to go a bit outside the box and stray away from the common designs, so I busted out my trusty nail art brushes and free-handed these giraffe print nails today!

Polishes used: China Glaze - Lemon Fizz & Over the Taupe
For these, I started out with a simple base of Lemon Fizz. Once dry, I used my smallest nail art brush to start working on the outlines of each of the brown areas. I then used a dotting tool to dab in the brown polish and fill in the spots. Some of the spots needed a second coat and others seemed a little thick, but a nice coat of Seche Vite smoothed everything out nicely!

SHARE:

February 1, 2013

31 Day Challenge - Day 12: Stripes

 -Anchor's Away -

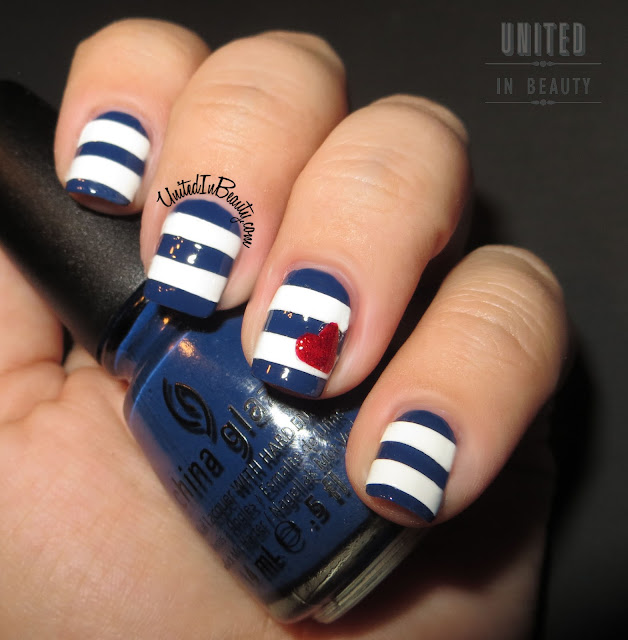
The theme of the day is stripes, and while painting, I totally fell in love with this navy and white striped manicure with glittery heart accent nail. I seem to recall seeing a few different variations on this design before, but I am not exactly sure where it originated.

Striped Nautical Nails
Polishes Used: China Glaze - First Mate, White on White, and Ruby Pumps

In my attempts to simplify the process, it turns out I more than likely ended up making it way more difficult than it had to be. Thanks to my shaky hands, I had to figure out a way to get straight lines, which can be difficult for even the steadiest of digits to freehand. After a little brainstorming, I decided to paint a piece of Scotch tape with white nail polish and cut it into strips of the desired width, then place the stripes directly on the nails.

When it came time to add the heart, I of course had to think of a way to make that more time consuming as well, because everyone knows if it's one thing I have plenty of, it's time.
After laboriously adding the stripes, I couldn't bear the thought of a shaky hand sending it all to hell in a handbasket, so I used a dotting tool to paint the heart on Scotch tape as well, then cut around the design with a pair of nail scissors and put my home made decal in place.

There you have it, after a bunch of unnecessary steps, I'm all finished with day 12!


SHARE:
© United In Beauty. All rights reserved.
Blogger Template by pipdig