


I finally received my Zoya Pixiedust Summer Edition, and I can definitely say that they arrived not a moment too soon! I don't think I could take much more daily mailbox stalking! Let me tell you, these new polishes are well worth the wait. One of the best things about the Pixiedust nail polishes is the fact that you are really getting two nail polishes in one.
You can use the Zoya Pixiedust Summer Edition as intended (without a base or top coat) and you will be left with a textured, matte, and sugary finish which is very on trend right now; or you may choose to add a topcoat such as Seche Vite, which will bring out all the sparkle and shine of the nail polish collection and give it a high gloss finish.
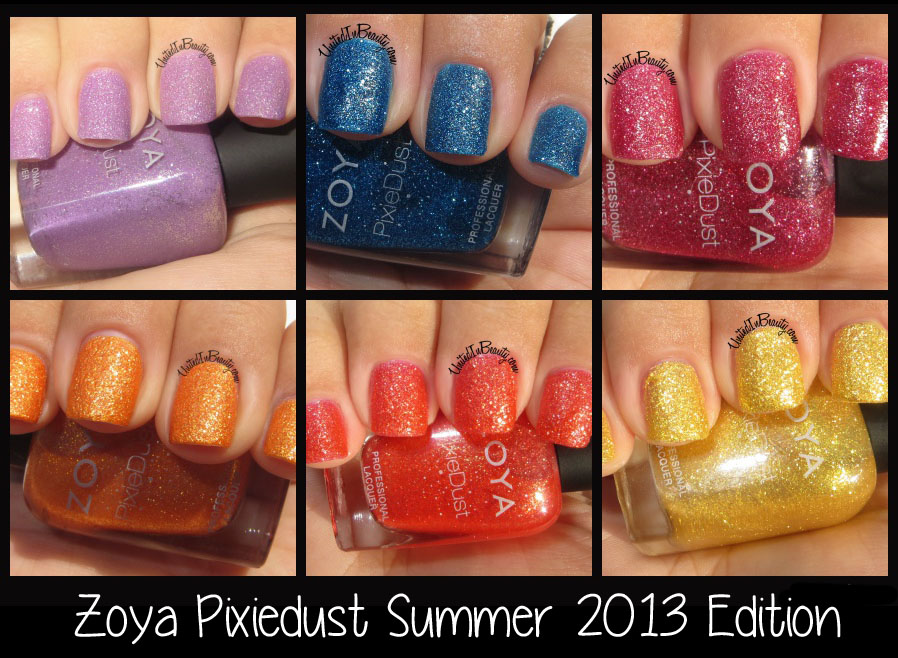
For your viewing pleasure, I've snapped a few pics of each of the new Zoya Pixiedust Summer Edition nail polishes, both with and without a topcoat so that you can compare for yourself.

STEVIE - Stevie is a gorgeous light violet polish with tons of silvery sparkles. This is one of my top pics from the collection for sure, as I would wear it regularly both as a matte and with a glossy topcoat. Once the topcoat is applied, the depth of the polish really starts to shine through. The pretty pastel shade is perfect for Summer, but also demure enough to wear during Spring as well. I know this polish will definitely be in my regular rotation.

LIBERTY - Liberty is, in a word... gorgeous. I absolutely love the shade of this bright blue nail polish. While I do enjoy it in its natural, matte pixiedust form, I have to admit that I am a complete sucker for what it becomes once I added a topcoat of Seche Vite. The only way to describe it is like having the complete depths of a stunning blue ocean on my fingertips. The sparkle really comes alive with the topcoat, and seems to shift shades when the sunlight hits it from certain angles. This is a must have, and my number one favorite from the collection.

MIRANDA - Miranda can best be described as a pretty rose colored nail polish with tiny plum undertones. I have always considered myself someone that cannot pull off the look of certain shades of rose polish, but this one seems to go along with my skin just right. Following in the footsteps of the previous Zoya Pixiedust swatches, Miranda is also quite stunning both as a matte Pixiedust and with a shiny topcoat. I loved the way the glitter flakes become more present with the topcoat, but also enjoy the bright and sugary matte finish as well. This particular shade is wonderful for Summer, but would also transition perfectly into Fall.

BEATRIX - Beatrix is, in my opinion, one of the ultimate Summer shades. The colors of orange and tangerine are so on trend right now, and this nail polish fits in perfectly. I love how bright and eye catching it is. When applied without topcoat, Beatrix is a lighter tangerine color with hidden sugary sparkles. Once topcoat is applied the shade seems to deepen a bit to a darker and warmer shade of orange, but the color change is well worth the trade for the depth the polish gains. This one would be perfect with a light and airy white outfit for a day out in the Summer sun.

DESTINY - Destiny is lovely bright color that I would describe as being halfway between a coral and a red. While I do enjoy the overall shade of the nail polish, I'm not so sure that this shade loves me back. I noticed that it seemed to look a bit funny against my particular skin tone, but I think it would look absolutely amazing of I spotted the shade on someone else. I'm not sure if it was just my eyes playing tricks on me, but I kept noticing little golden undertones that were very pretty when the sun would hit my nails and pick up the foil flecks. I can see this color becoming quite popular once the warm weather hits around here.

SOLANGE - Solange is the final swatch in the Zoya Pixiedust Summer Edition, and it is definitely last but not least. Zoya states that this particular nail polish features an exclusive gold pigment, and I'm not sure exactly what that means, but what I do know is that when they say gold, they mean gold. Based on the pictures I saw, I expected this gold metal foil polish to be more yellowy than golden, but it really looks like someone shaved down a bar of gold and planted it right on the tops of my nails. There was not a dramatic difference in the overall look of this polish once I added the topcoat, but it is noticeably different and appears to have more depth, much like the other swatches.
Overall, I'd have to say that Zoya has done it again with the Pixiedust Summer Edition polishes. I'm so glad that I went ahead and purchased the entire collection. I know that I will be putting each and every one of these to good use in the upcoming months. All I know is that Zoya has really set the scene, so I'm hoping they will blow my socks off by creating fantastic Fall and Winter editions. I can't get enough of the Pixiedust formula, and don't see my obsession fading away anytime soon.
Zoya Pixiedust Summer Edition polishes can be purchased directly on Zoya.com and retail for $9 each.


