Trending

May 2, 2013

ASP Quick Dip Acrylic Kit Review

Even though I have been rockin' my natural nails for many many years now, I got a wee bit of a bee in my bonnet yesterday and decided that I would like to try doing my own acrylic overlays. Easier said than done. After some extensive research which consisted of about 8 minutes of watching YouTube videos, I headed over to my local Sally's.

After some deliberation, I decided that I was going home with this $15 ASP Quick Dip Acrylic Kit. The point of the kit is that it is designed to be easy for beginners since it requires no molding  of the acrylic powder. The instructions state to simply apply a thin layer of glue, dip your finger into the powder, and finish with a spray of the acrylic cure.
. ASP Quick Dip Acrylic Kit
Photo:Aspnail.com
Try it, they say. It'll be fun, they say...
I have to admit, after trying the kit out, I feel like the claim the box made that a full set can be completed in under 25 minutes was a little bit ambitious. Granted that it was my first time, I found the entire process to take close to an hour.  

For a first timer, it was also quite a messy process for me.  I learned as I went along that I had better luck just ignoring the specific instructions that came in the kit and just doing my own thing. The guide says to apply several layers of the glue and powder, but I did best with just 1-2. Also, I lightly tapped the powder down with my finger after dipping. When I didn't, I found the result to be very bumpy.
Naked Nails
BEFORE  
While this is not the best quality, I happened to have snapped this cell phone picture the other day of my naked nails to give you an idea of my starting point.
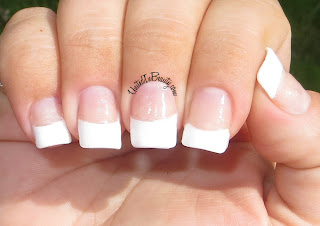
Acrylic nails with french manicure
AFTER
I think that with a little bit of practice, this kit could be very useful for a quick set of nails.
Overall Rating: 3.5/5 GlamourGals
 

SHARE:

April 29, 2013

Zoya Earthday Promo 2013 Haul

 Zoya Earthday 2013 Promo Haul


Zoya - If loving you is wrong, I don't wanna be right...

My Earthday Promo haul arrived today and I couldn't be more pleased with these gorgeous nail polish colors that I picked out! I don't have too many Zoya nail polishes in my collection, and now I see just what I've been missing out on. These will definitely keep me busy with swatching and nail art for a while. Now I've just got to stop admiring them long enough to package up and send back my old toxic polishes! Zoya for the win!

Pictured from left to right:
Micky, Wednesday, Dove, Charisma, Caitlin, Lo, Josie, Thandie, Mira, Ali, Darcy, Rocky, Kelly, Kennedy, and Kieko.
 Zoya Earthday Promo 2013

SHARE:

April 28, 2013

Wet N' Wild Violet and Lavender Color Blocked Nail Art

Today I have a great Springtime look that I put together using two of the new Wet N' Wild Megalast nail polishes - On a Trip and Through the Grapevine. Both of these purple polishes caught my eye and were just too lovely for me to pass up and leave sitting there on the shelf.


I don't have too much experience with the Wet N' Wild brand, so I was a bit surprised when I pulled the cap off and got a good look at the brush. The brush is a bit on the thick side and is also awkwardly shaped in an uneven arch. According to the sticker on the top of the bottle this is called their "ManiCurve Pro Brush," and unfortunately I have to say that I am not a fan at all. I found that the bristles are way too stiff and the brush itself was also too thick, which made polishing a very messy task. For that reason alone, I think I'll be staying clear of the Megalast polishes for a while.


I started this look off by painting my nails with two thin coats of the lighter lavender polish, called On a Trip. If you are recreating this look, you will want to be be absolutely certain that the first layer of nail polish is completely dry before moving on, or you're going to have a bad time. Once the lavender layer had dried completely, I started to move on to the next step.
    
  
Using short strips of manicure tape, first I started by dividing each nail up into four equal quadrants. Next, I used the darker violet color that is called Through the Grapevine to fill in both the top and bottom sections. While the polish was still wet, I pulled the tape off and let the violet sections dry completely. A little pearlized bead glued smack dab in the middle finished off the look, and viola, adorable Springtime color block nail art!


SHARE:

April 26, 2013

Green Camouflage Nail Art With China Glaze and OPI

Those of you that follow me on Facebook and Twitter may already know that I got a little overanxious yesterday and decided that I was going to leave my nails naked and bare without nail polish until my Zoya Earth Day Promo polishes arrived. Upon noticing that my nail polish order is not due to arrive until the 29th, I suppose that was a bit over-ambitious. 

We all know I can't go that long without painting my nails, I just can't. Based on that and that alone, I present to you my camo inspired manicure for today's nail art look!

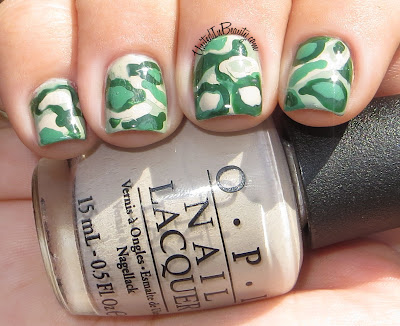
Green Camo Manicure Nail Art

I decided to start out with painting a base coat of one of my lesser used polishes, a light Army green color called Kaki by a brand called IrisColors. I found this polish at a small neighborhood beauty supply store a while back and always forget I have it. My apologies that you will probably not be able to locate this exact color easily, but any light Army green will do for this look.


Green Camo Manicure Nail Art

Next, I just used my polish brushes to begin to randomly splotch small areas of the nail in three accent colors, which are:
O.P.I - Did You Ear About Van Gogh? 
O.P.I. Don't Mess With OPI
China Glaze - Holly Day
Camo Nail Art Manicure
Polishes used: OPI - Don't Mess With OPI & Did You Ear About Van Gogh? China Glaze- Holly Days, IrisColors - Kaki
In order to increase the randomness of the splotches, I layered up a few of them. I found that this really helped give my nail art the authentic camouflage look.

At this point, my manicure began to look a bit bumpy from the different layers of polish that I had dabbed on. Not to worry though, one good thick coat of Seche Vite (what I consider to be my miracle topcoat) smoothed everything right out and left me with a high shine glossy finish.

SHARE:
© United In Beauty. All rights reserved.
Blogger Template by pipdig