Trending

February 10, 2013

Swatch and Learn : Zoya Pixie Dust!


Today I want to bring you some swatches from the brand new Zoya Pixie Dust Collection! Once dry, every polish has a matte sparkle finish with a very textured effect. One thing I learned about myself while swatching these is that I am an EXTREMELY fickle polish lover! 

Every polish I seemed to love more than the last. While each polish was on my nails, it was like no other polish in the world ever existed. I just wouldn't feel right if I didn't warn you, tread lightly with these, you may not ever want to wear another collection again!

 ARE YOU SITTING DOWN?

First up is my personal favorite of the collection - Dahlia. 
I know I know, I already admitted I'm fickle but I have truly deliberated and chose this as the one I love the most. I literally feel as if angels flew down from heaven with crushed black diamonds in their hands and placed them directly on my nails. The picture DOES NOT show the true sparkle of these. They are amaze-balls. Trust me, you want it.
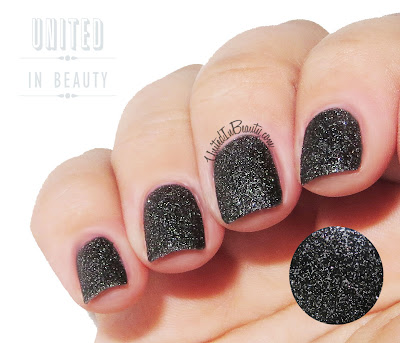
Zoya Dahlia
Zoya - Dahlia
Secondly, I want to show off Godiva. 
The polish is a beautiful pale cream color, and reminds me of sparkly sand from an exotic beach. The sparkle effect is not as intense with Godiva, due to the lightness of the shade. There really isn't enough contrast to let the sparkle shine through at all times, but in the right light it is definitely eye catching.
Zoya Godiva
Zoya - Godiva
Next we have NYX, which is a gorgeous shade of periwinkle.
When it dried, it really reminded me of sugared candy crystals. I love that the color is so perfect for Springtime too! I found that in certain light is has more of a purple tint to it, and in other light it can look slightly more blue.
Zoya NYX
Zoya - NYX
Vespa is a soft muted green that I found just as wonderful as the rest. 
I love that the color is so soft and pastel, at first glace and then the sparkle sets in like BAM!
Zoya Vespa
Zoya - Vespa
The brightest color of the bunch is Chyna. 
I typically don't love the look of red polish on me too much, but once this was on, it won me over. You can really see the texture of the polish in this swatch too. Once dry, it doesn't have a gritty feeling at all like I suspected it would.
Zoya Chyna
Zoya - Chyna
Another favorite of mine from the group is London. 
In general, I LOVE the color gray and this is no exception. London reminds me of a thick fog on a snowy day with the way the sparkle peeks through the polish. I would definitely wear this one on a daily basis, it is simply gorgeous!
Zoya London
Zoya - London
A few words of advice - Definitely make sure to wrap the tips of your nails with this collection. If you forget, you will find it to be very noticeable after it dries. I wrapped each nail and let the polish set for a few minutes, then lightly tapped the edges so that it was all even and patted down. 

Once dry, the glitter does not fall off and it doesn't have a gritty feeling at all like I suspected it would. I actually enjoyed the feeling of running my fingers over the polish!  

When using the Pixie Dust polishes, it is recommended that you apply 2-3 coats without any base or top coat. Applying top coat will nullify the textured finish and give you any entirely new look with a sparkly shine. Basically, you get two polishes in one - Bonus!

The collection sells for $9.00 per bottle and is available now on Zoya.com
SHARE:

31 Day Challenge - Day 21: Inspired By Color

 -Valentine's Heart Manicure -

The theme of the day is inspired by color, so I decided it was the perfect time to "think pink" and take the opportunity to create this soft pretty pink hearts mani just in time for Valentine's Day!

Polishes used: China Glaze - Laced Up & White On White. Stamping plate : Cheeky CH15

SHARE:

February 9, 2013

31 Day Challenge - Day 20: Water Marble

- Adventures In Water Marbling With A Side Of Rage -

Well folks, here we have it. The day you've all been waiting for and the day I've been stressing over since the beginning of this challenge. The dreaded water marble technique...
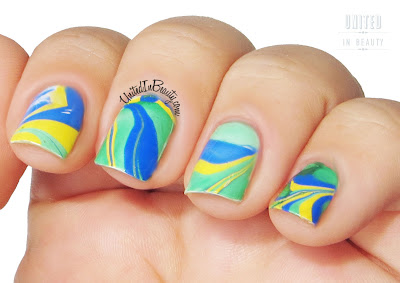
Water marble nails technique
Polishes used: Sally Hansen Xtreme Wear in Pacific Blue & Going Green, China Glaze - Happy Go Lucky
While there is most definitely a strong learning curve, once I got the hang of it I actually found it to be pretty fun. It took a little bit of trial and error, but I have to admit that overall I'm pretty pleased with the results for my first attempt! The process was quite messy, but I'm fairly certain that is partially due to me shrieking with rage face and knocking over my entire setup midway through the process. For your enjoyment, I have included this artists rendering of the events that took place today:

  
If you are thinking of trying this technique, be sure that your water is room temperature or slightly warmer. I found that cold water caused my polish to dry on the surface or sink to the bottom in droplets.  Also, hold your brush close to the water surface when dropping, holding the brush too high above didn't work out for me at all.

Many people recommend using cuticle oil, vaseline or tape around the skin to minimize on cleanup time. But being the rebel that I am, I threw caution to the wind and hit this water marble raw dog. I didn't choose the thug life, thug life chose me.

Give water marble a try, it can really create some brilliant designs!
Check out this great picture tutorial from fellow blogger PolishandPearls.com and let me know if you try this yourself!

SHARE:

February 8, 2013

31 Day Challenge - Day 19: Galaxy Nails


- Glittery Galaxy Nails -

One of the best things about this ongoing challenge is all the new things that I am learning! I have always been a fan of Galaxy nails, but I honestly had no idea that they were so easy!
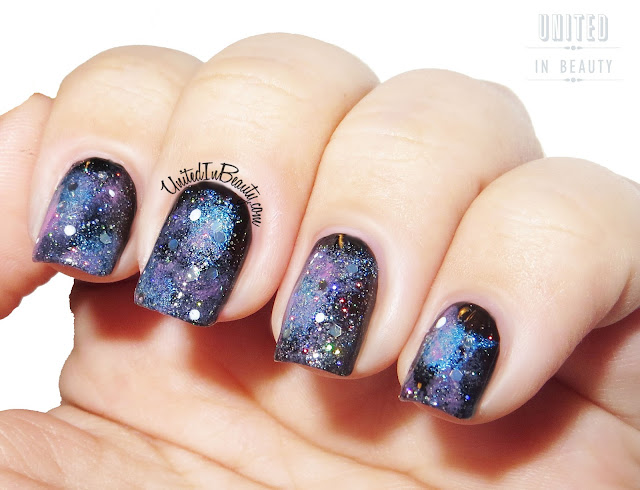
Galaxy Nails
Polishes used: Orly - Liquid Vinyl & Sweet Peacock, China Glaze - Laced Up, White On White, Fairy Dust & Techno, OPI - I Have A Herring Problem
This was spectacularly easy to create! The only additional tools I used to create this look were a makeup wedge and a small dotting tool.  

While I was working on this design, one of the things that I learned is that you will definitely have better luck with wet makeup wedge than with a dry one. If the sponge is too dry, you may end up with tiny sponge pieces on your nails, which are a pain to pick off! 

The first step is to paint the nails with one coat of black polish. Once dry, I used the wet makeup wedge to begin sponging on a very tiny amount of the blue polish in random areas.
 
There is no need to wait for the blue polish to dry, just go ahead and sponge on a tiny amount of lighter blue/gray polish over the first. You want to keep a light hand with this, or you will cover your original splotches. 

Now it's time to add the pink. You want barely any polish at all on your wet sponge for this, it's only meant to give your galaxy a hint of pink. 

Once all the polish is dry, it's time to add the sparkle. This is where the magic really happens, and each nail begins to look like a real galaxy! I used a very thin layer of fairy dust and was amazed at how good it looked. I also hand placed the glitter from Techo in random areas to look like bright stars in the night sky. I finished off by using my smallest dotting tool dipped in white polish to add one or two randomly placed VERY tiny dots to each nail, which gave a bit more dimension to the finished look.

Topped off with a nice coat of Seche Vite, I've got a super shiny galaxy on each nail! 
SHARE:
© United In Beauty. All rights reserved.
Blogger Template by pipdig